Ready to take your nail game to the next level? Stunning nail designs can change your style completely. Ombre nail art is a top pick for a chic, modern look.
Pink ombre nails are a hit among nail fans. They’re perfect for any event. This guide will show you how to get a stunning ombre nail look. You’ll learn expert tips for a flawless effect.
Key Takeaways
- Discover the latest trends in ombre nail design
- Learn expert tips for achieving a flawless ombre effect
- Explore different ways to incorporate pink nail art into your look
- Get inspired with ideas for various occasions and styles
- Understand the basics of creating a stunning ombre nail look at home
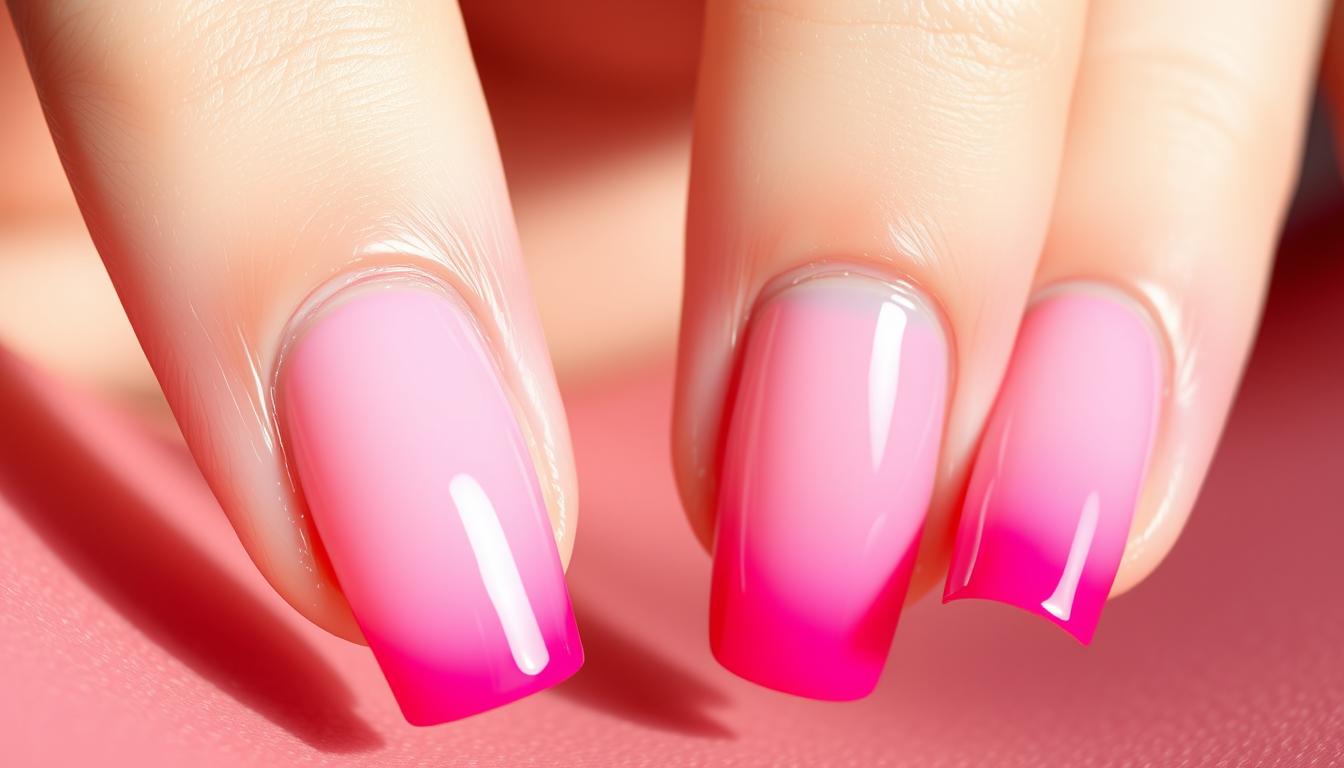
What Are Pink Ombre Nails?
Ombre nails, like pink ones, blend colors for a stunning look. This technique is popular for its gradient effect. It makes your nails look multi-dimensional.
Understanding Ombre Nail Art
Ombre nail art blends colors from dark to light or light to dark. You can use sponging, brushing, or special tools to achieve this. To get gradient nails right, you need to know about color theory and have a steady hand.
Choosing the right colors is key for an ombre nail design. For a white pink ombre, pick a pure white and a soft pink. The colors should blend smoothly for a harmonious look.
- Start with a base color to unify your nails.
- Use a makeup sponge to dab the ombre colors onto your nails.
- Blend the colors gently for a smooth transition.
- Finish with a top coat to seal your design.
Origins of Ombre Styles
The word “ombre” means “shaded” in French. It’s used in hair coloring, makeup, and nail art. Ombre nails are loved for their versatility and creativity.
At first, how to do ombre nails might seem hard. But with practice, it gets easier. Try different colors and techniques to find your style. Ombre nail art is perfect for both beginners and pros.
The Allure of Pink Ombre Nails
Pink ombre nails are loved for their ability to match any skin tone and style. They have become a key part of nail art. Their appeal comes from being versatile and beautiful.
Why Choose Pink for Ombre?
Pink is a color that looks good on everyone, for any event. The pink nail trend is growing because it adds elegance to any look.
Pink is great for ombre nails because it comes in many shades. You can pick a shade that shows your personality and matches your skin.
Variations of Pink Shades
Pink offers many options for best ombre nail colors. Here are some favorites:
- Soft pastel pinks for a romantic look
- Bright coral pinks for a fun summer vibe
- Dusty rose pinks for elegance
- Hot magenta pinks for a bold statement
These shades make pink nail art a hit. Pink ombre nails are perfect for both classic and trendy looks.
Nail experts say, “Pink nails are not just a vibe; they’re THE vibe.” This is true because pink ombre nails offer endless creativity.
Tools and Materials Needed
For a great DIY ombre nails job, you need the right tools and materials. To get a pro-like finish, gather these essential items before starting your ombre nail tutorial.
Essential Nail Tools
You’ll start with basic nail tools. You’ll need a nail polish remover, nail clippers, and a cuticle pusher. A makeup sponge is key for the ombre look, blending best ombre nail colors smoothly. You might also use masking tape to keep your skin safe from polish and to define your nail edges.
A toothpick or thin brush is handy for cleaning up polish around your cuticles and nail bed. For a precise look, a nail art brush is a good choice. These tools will help you get a smooth, professional finish in your DIY ombre nails project.
Recommended Nail Polishes
Choosing the right nail polishes is key for a successful ombre nail tutorial. For pink ombre nails, pick two shades of pink, one light and one dark. Look for polishes with good pigmentation and blendability, which are the best ombre nail colors. A white or cream base coat can also help the colors blend better.
To make your design pop, add glitter or shimmer polishes. These can be layered over your ombre base for a bold look. Remember, blending the colors well is the secret to a great ombre effect. Choose polishes that complement each other.
Step-by-Step Guide to Pink Ombre Nails
Learn how to do pink ombre nails at home with this guide. Ombre nail art is loved by many, and you can get a pro look with the right steps.
Preparing Your Nails
Begin with clean nails. Remove old polish and shape them as you like. Apply a base coat to protect and strengthen your nails. This step is key for healthy nails and to prevent staining.
Applying Base Colors
Choose a light pink or nude base color. Apply a thin coat and let it dry fully before adding more. This creates a smooth base for your ombre.
Make sure each coat dries well to avoid mess. Use a nail dryer or fan to dry faster.
Mastering the Ombre Technique
You’ll need a makeup sponge and different nail polish shades for the ombre. Start with the lightest shade on the sponge. Gently dab it onto your nail, moving to darker shades. This creates a smooth color transition.
For a bold look, layer colors, letting each dry before adding more. It might take practice, but keep trying.
Tips for a Flawless Finish
The secret to amazing pink ombre nails is in the details. It’s all about how you blend colors and apply them. To get a pro look, you need to know a few key tips.
Maintaining Smooth Transitions
To get a smooth blend, let each layer dry for a bit before adding more. This patience will make your gradient look flawless. Start with a base coat, then a light white polish at the cuticle.
Slowly add more pink towards the tip. Use a gentle dabbing motion with your brush or a makeup sponge.
After you’ve got your gradient, clean up any extra polish around your nails. Use a cuticle pusher or a toothpick for this. It’s key for a clean, pro finish.
Preventing Common Mistakes
A big mistake in ombre nail art is uneven color. To fix this, apply your gradient with even, gentle strokes. Not letting polish dry between layers can also mess up your look. So, be patient and take your time for a smooth ombre effect.
Also, don’t forget to use a top coat. It seals your design, adds shine, and makes your ombre nails pop and last longer.
Popular Pink Ombre Nail Designs

Pink ombre nails are loved for their beauty and variety. They come in many styles, from soft to bold, and can be sparkly or simple. This makes them a top choice for nail art.
Gradient Styles
At the core of pink ombre nails are gradient styles. These can be soft and pale or bold and bright. The secret to a great gradient is blending colors smoothly.
- Soft and Subtle: Great for those who like a quiet elegance, these gradients are soft.
- Bold and Vibrant: For those who want to make a splash, bold gradients are perfect.
To get a perfect gradient, use the right tools and practice blending colors. This will help you achieve a natural look.
Glitter and Shine
Adding glitter to pink ombre nails can make them shine. You can use glitter in many ways, from a light sprinkle to a full topcoat. This adds a touch of glamour.
Here are some ways to add glitter:
- Use a glitter gradient that matches the pink ombre.
- Apply a glitter topcoat for a shiny finish.
- Make one nail stand out with glitter for a fancy touch.
Nail artists say the right glitter can make a design pop. It adds depth that polish alone can’t match. With glitter, a simple pink ombre can become a stunning work of art.
Whether you prefer soft gradients or love the sparkle of glitter, pink ombre nails are full of possibilities. They let you express your creativity in many ways.
Seasonal Pink Ombre Ideas
Pink ombre nails can add a stunning touch to your look all year round. As seasons change, so can your nail art. It can show off the latest trends and moods.
“The white pink ombre nail trend makes for a perfect summer look,” it’s a great starting point. For spring, try softer, pastel pink shades. They remind us of blooming flowers.
Spring-Inspired Designs
Spring is the perfect time for pastel pink ombre nails. Add subtle glitter or floral accents for a fresh look. These designs capture spring’s renewal and vibrancy.
- Soft pink ombre with white tips
- Pastel pink with glitter gradient
- Floral patterns on pink ombre nails
Festive Fall Options
When fall comes, switch to richer, deeper pink shades. These match the season’s warm tones. Add metallic or leaf-inspired nail art for a festive look.
- Deep pink ombre with golden accents
- Rich berry shades with ombre effect
- Leaf patterns on pink ombre nails
Adapting your pink ombre nail designs to the season keeps your look fresh. Whether it’s a spring garden party or a fall festival, your nail art reflects the season’s spirit.
Customizing Your Pink Ombre Nails
Make your nail game better by adding your own special touch to your pink ombre nails. Customizing lets you show off your unique style and make your nail art pop.
Adding Nail Art Accents
Nail art accents can turn a basic ombre design into a beautiful work of art. Think about adding rhinestones, glitter, or nail stickers for a personal flair.
Try out different patterns like stripes, dots, or flowers to spice up your ombre nails. The most important thing is to have fun and be creative with your nail art.
Utilizing Different Textures
Mixing textures can make your pink ombre nails more interesting. Try mixing matte and glossy finishes or adding glitter polish for extra shine.
Playing with textures can make your nail design more eye-catching. You can do this by layering different products or using special nail polishes.
| Texture Combination | Description | Effect |
|---|---|---|
| Matte & Glossy | Layering matte and glossy finishes | Creates a sophisticated contrast |
| Glitter & Solid | Combining glitter polish with solid colors | Adds a touch of glamour |
| Holographic & Ombre | Using holographic polish over ombre base | Gives a futuristic, eye-catching effect |
By using these customization tips, you can make your pink ombre nails truly unique and show off your personal style.
Nail Care Tips for Ombre Designs
Proper nail care keeps your ombre nails looking great and healthy. It not only makes your nails look better but also keeps them healthy.
Keeping Your Nails Healthy
Start with a good base for healthy nails. Apply a base coat to protect and strengthen your nails. It acts as a shield between your nail and polish, preventing stains and promoting health. Experts say using a base coat makes your manicure last longer.
“A good base coat is essential for a long-lasting manicure.”
Also, keep your nails moisturized. Use a nourishing cuticle oil often. This stops dryness and brittleness.
Ensuring Longevity of Your Manicure
To extend your ombre manicure, don’t use your nails as tools. Wear gloves for chores or when exposed to harsh chemicals. Applying a top coat regularly keeps your design shiny and intact.
Be gentle with your nails and avoid too much filing or buffing. These steps help keep your pink ombre nails looking good for longer.
Choosing the Right Nail Length
Trying out different nail lengths and shapes can really boost your pink ombre nail look. The length and shape of your nails greatly affect how your pink ombre nails look.
Short vs. Long Ombre Nails
Think about your lifestyle and what you like when picking the length of your ombre nails. Short nails are good for active people or those who use their hands a lot. Long nails, on the other hand, can be a big fashion statement.
- Short nails: Great for active lifestyles or for those who work with their hands a lot.
- Long nails: Perfect for special events or for making a bold fashion statement.
| Nail Length | Best For | Considerations |
|---|---|---|
| Short | Active lifestyles, practicality | Less prone to damage, easy to maintain |
| Long | Special occasions, fashion statements | More prone to damage, requires more maintenance |
Best Shapes for Pink Ombre
The shape of your nails can either enhance or lessen your ombre nail design. Popular shapes include oval, almond, and square.
- Oval: A timeless choice that fits most nail beds and is perfect for pink ombre nails.
- Almond: Makes the nail bed look longer and adds elegance to your nail shapes.
- Square: Bold and modern, great for medium to long nail lengths.
By picking the right nail length and shape, you can make your pink ombre nails look even better. It’s a stylish way to express yourself.
The Best Nail Salons for Pink Ombre
Getting the perfect pink ombre nails depends on the salon you pick. A good nail technician can make your dream nails come true. They ensure a flawless finish that boosts your look.
We’ve made a guide to find the best salon in major cities. We also share key things to think about when choosing.
Top Spots in Major Cities
Big cities have many nail salons, each with its own special touch. Here are some top picks for cities across the United States:
| City | Salon Name | Notable Features |
|---|---|---|
| New York | Nail Bliss | Expertise in ombre nail designs, luxurious ambiance |
| Los Angeles | Nail Lounge | Variety of pink shades, personalized service |
| Chicago | The Nail Studio | Highly skilled technicians, wide range of nail art options |
Factors to Consider When Choosing a Salon
Choosing the right nail salon is more than just picking a place. Here are important things to think about:
- Expertise: Find salons with techs who know ombre nail design.
- Product Quality: Make sure they use safe, durable nail products.
- Customer Reviews: Look at online reviews to see how happy customers are.
- Hygiene and Safety: A clean, safe place is key for a great nail experience.
By thinking about these points and visiting top-rated salons, you’ll get stunning pink ombre nails. These nails will show off your style.
DIY vs. Professional Application

You can choose between DIY and professional application for your pink ombre nails. Each option has its own pros and cons. Knowing these differences helps you make a choice that fits your needs and style.
Pros and Cons of Each Option
Choosing a DIY ombre nail tutorial can save you money and let you try out new designs at home. But, it needs skill and patience, and the results might not always be perfect. On the other hand, professional nail application gives you a top-notch finish and long-lasting nails. Yet, it costs more and you need to book an appointment.
- DIY Ombre Nails:
- Pros: Cost-effective, flexible, and can be a fun DIY project.
- Cons: Requires skill, time-consuming, and results may not be consistent.
- Professional Nail Application:
- Pros: High-quality finish, long-lasting, and no need for personal effort.
- Cons: More expensive, requires an appointment, and less control over the design process.
When to Seek Professional Help
If you’re new to nail art or unsure about getting the ombre effect right, get professional nail application. Experts can give you flawless results and help pick the best design for you.
- If you want a complex design or are unsure about the technique.
- If you’re short on time or prefer not to spend time on DIY nail art.
- If you have had poor results with DIY nail applications in the past.
The choice between DIY ombre nails and professional application depends on your personal preferences, skill level, and desired look.
Social Media Inspiration
Social media is full of the latest pink ombre nail trends. Whether you want something simple or bold, Instagram and Pinterest have lots to show you. They offer images and tutorials to help you get started.
Popular Pink Ombre Nail Trends
Pink ombre nails are very versatile. You can find shades from soft pastels to bright magentas. Right now, glitter ombre and ombre with nail art are big, adding a fun twist to the classic look.
On social media, you’ll see many designs. Here are a few:
- Gradient ombre that goes from light pink at the cuticle to darker at the tip.
- Glitter ombre for a sparkly look.
- Ombre with nail art, mixing the gradient with detailed designs.
A nail artist on Instagram says, “The secret to a great ombre is blending the colors smoothly.”
“The ombre technique is all about creativity. It’s not just the colors, but how you blend them,” says nail artist @nailartbyexpert.
Influencers to Follow for Ideas
For the newest pink ombre nail designs, check out these influencers:
| Influencer | Platform | Specialty |
|---|---|---|
| @nailartbyexpert | Ombre and nail art | |
| @pinknailspolish | Pink ombre designs | |
| @nailtrendsetter | Latest nail trends |
By following these influencers and staying active on social media, you’ll be up-to-date on pink ombre nail art trends.
Addressing Allergies and Sensitivities
When looking into nail care, knowing about allergens in nail products is key. Allergies and sensitivities can range from mild to severe. It’s important to know what you’re putting on your nails and skin.
Common Allergens in Nail Products
Nail products, like polishes, glues, and acrylics, have chemicals that can trigger allergies. Some common allergens include:
- Formaldehyde: Found in some hardeners and polishes, it can irritate the skin and cause health problems.
- Toluene: Used in polishes and glues, it can irritate and is linked to serious health issues with long-term use.
- DBP (Dibutyl Phthalate): Makes polish flexible but is also a common allergen that raises health concerns.
Knowing about these ingredients helps you choose safer nail products.
Alternatives for Sensitive Skin
If you have sensitive skin or allergies, there are safe nail care options. Here are some alternatives:
- 5-free or 7-free polishes that avoid harmful chemicals like formaldehyde, toluene, and DBP.
- Nail glues and acrylics made for sensitive skin or labeled as hypoallergenic.
- Natural or organic nail care products with fewer synthetic chemicals.
Choosing products safe for sensitive skin can help avoid allergic reactions. This way, you can have healthy, beautiful nails.
Final Thoughts on Pink Ombre Nails
Pink ombre nails are a trendy way to express yourself. They range from soft, natural colors to bright, bold ones. This style can make your look pop and show off your personality.
Embracing Your Unique Style
This guide has given you the tools to make your own pink ombre nails. Try out different colors and designs to find what suits you best.
Staying Current with Nail Trends
To keep your nails looking great, stay up-to-date with nail trends. Follow nail artists and influencers for new ideas and techniques. Whether you like to do it yourself or get a professional to do it, pink ombre nails offer endless creativity.