What if your favorite series could live on your skin as a bold story rather than just a memory?
This buyer’s guide helps you choose body art that fits your life and style. You will learn how to pick the right design, vet an artist, and plan for lasting color and crisp lines.
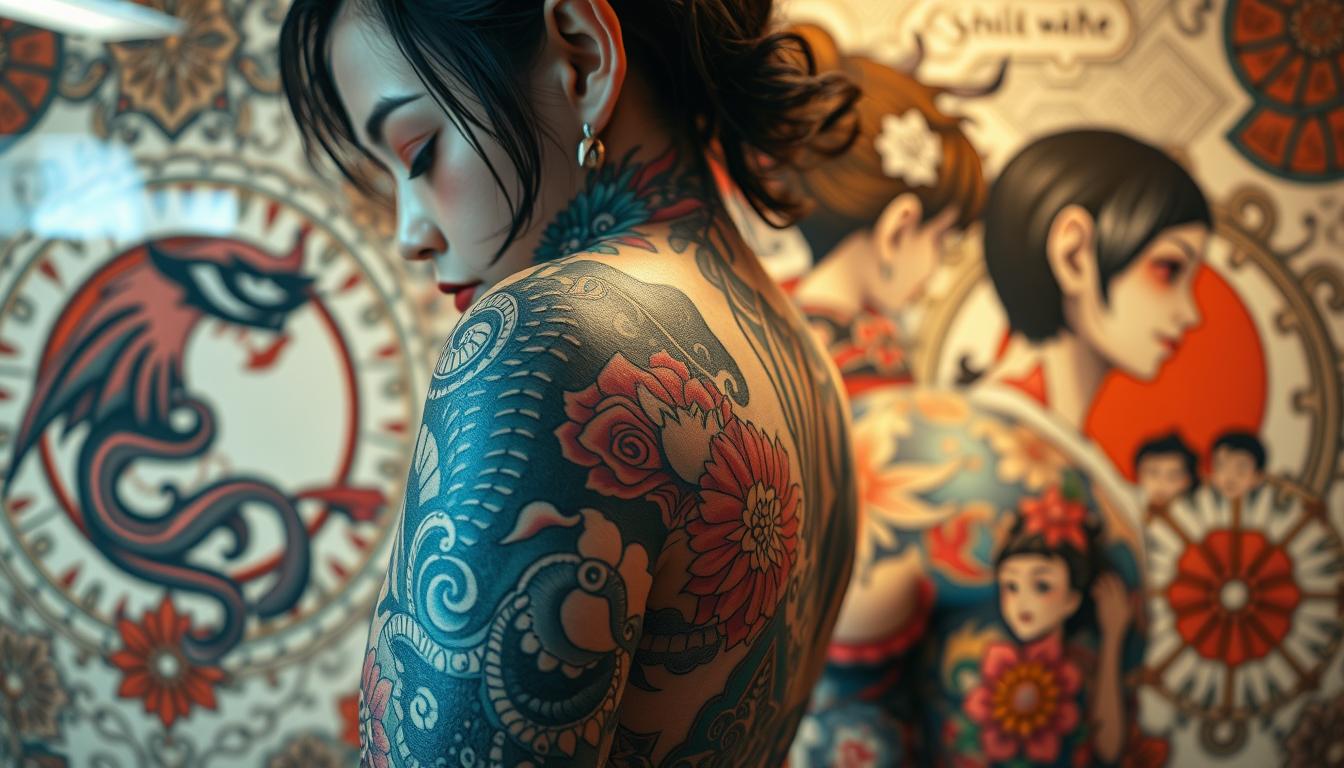
Anime and related art demand expressive color, bold line weights, and faithful facial proportions. Not every artist can translate screen work to skin, so co-creating with experienced artists matters.
Think about world-building: a single series, a blended sleeve, or original characters. Make cohesion and readability your guide, and consider sun exposure, dress codes, and activity level when placing your piece.
You can get a stunning, timeless piece with the right planning, references, and the best artist for your vision.
Key Takeaways
- Learn to match tattoo ideas to your daily life and long-term care.
- Seek artists skilled in fine lines, color saturation, and anime art.
- Prioritize cohesion when combining characters or motifs into one work.
- Plan placement with sun exposure and dress codes in mind.
- Build a clear concept list to guide consultations and sessions.
- This guide answers frequently asked questions on budgeting and sessions.
Start Here: How to Buy an Anime Tattoo You’ll Still Love Years From Now
A lasting piece needs more than a great sketch — it needs decisions made for skin and time.
Buying body art means choosing a clear concept, booking the right artist, and scheduling enough sessions so the tattoo design fits your skin and daily life. Make sure placement and contrast suit how your skin moves and ages.
Pick an artist who specializes in strong linework and understands shading techniques and intricate details. Bring focused references that show the exact character pose, face, and expression you want. Avoid tiny text or hairlines that won’t hold once healed.
- Ask these questions: line weight, healed portfolio, and how they adapt an anime character to anatomy.
- Discuss styles: black-and-gray vs vibrant color, contrast vs soft gradients for long-term clarity.
- Budget time: plan for multi-session work and touch-ups so your best anime tattoo stays crisp.
Collaborate with your artist and commit to proper aftercare and sun protection. Trust on-skin adjustments — that collaboration makes the ink live well for years.
Popular Anime Tattoo Designs and What They Mean

Naruto ideas range from minimalist Leaf Village emblems to bold Akatsuki clouds. Portraits of Itachi or Sasuke need careful line weight so gaze and hair stay clear after healing.
Naruto symbols, clouds, and portraits
- Leaf emblem: simple and timeless.
- Akatsuki clouds: graphic and statement-making.
- Portraits: require crisp linework to avoid blur.
One Piece emblems, swords, and Devil Fruits
Straw Hat logos say freedom and loyalty. Zoro’s swords need strict perspective. Devil Fruits are symbolic but benefit from strong contour lines and balanced color.
Dragon Ball Z icons: energy auras and Shenron
Super Saiyan hair and auras must keep silhouette clarity. Shenron demands even scale so the dragon doesn’t distort as the arm moves.
“Choose clear silhouettes and talk shading techniques with your artist to protect facial detail and proportion.”
| Design | Meaning | Care Tip |
|---|---|---|
| Leaf / Emblem | Identity | Small size OK |
| Devil Fruit | Risk & Reward | Bold outlines |
| Transmutation Circle | Knowledge | Geometric precision |
Quick advice: pick favorite moments with clear shapes, test a small stencil, and add simple frames (clouds or panels) to separate ink from skin tone.
Choosing Your Style: From Blackwork to Watercolor Anime Tattoos
Pick a visual language that will age well on skin and still read clearly from a short distance.
Bold outlines and intricate shading techniques form the backbone of long-lasting pieces. Blackwork and neo-traditional approaches use heavy outer lines plus layered shading to protect facial detail and props.
Vibrant colors versus muted palettes: saturation and contrast
Vibrant colors pop but need dark anchors. Use deep tones behind hair, eyes, and armor so focal points don’t wash into the skin.
Test swatches on your skin. Some hues shift after healing, and complementary pairings help preserve readable edges.
Watercolor anime tattoos: stunning look, faster fade considerations
Watercolor anime tattoos are gorgeous when fresh. Make sure you accept more frequent touch-ups and potential fading.
Limit soft pastels for micro pieces—gradients need surface area to stay crisp.
Neo-traditional and blackwork fusions for timeless anime ink
Fusions keep the expressive feel of anime art styles while adding time-tested structure. Ask your artist to thicken outer lines, simplify tiny details, and boost contrast.
“Reinforced line architecture and smart color choices protect the best anime tattoo over decades.”
- Compare executions: blackwork = longevity; neo-trad = bold yet classic; watercolor = high wow, higher upkeep.
- Plan placement away from high-friction, sun-exposed spots to keep ink saturated longer.
- Collaborate on the tattoo design so lines, shading techniques, and palette match the artist’s strengths.
Go Big or Keep It Minimal: Sleeves, Panels, and Small Anime Tattoos

Size changes how a design reads on your body. A sleeve lets you tell a longer story with multiple characters and scenes. Small pieces offer a subtle, wearable nod to a favorite moment.
Anime sleeve planning: cohesive flow and color strategy
Plan a theme—one series or a thoughtful crossover—to keep the sleeve cohesive. Map panel breaks or environmental transitions so each scene breathes.
Anchor one primary character and support it with smaller motifs. This creates a focal hierarchy so faces don’t compete for attention.
Pick a consistent palette and place darker anchors behind hair and eyes. That prevents adjacent scenes from clashing and preserves depth as the skin moves.
Micro and minimalist designs: linework precision and longevity
Small pieces need simplified shapes. Minimize fine details and avoid hairlines that may blur.
Test stencil sizes and line weights so the character stays readable at arm’s length. Place micro designs on stable skin—inner forearm or calf—rather than fingers or high-friction spots.
Consider a single color accent—a pop in the eyes or emblem—to keep impact without over-saturating a tiny area.
- Use panel tattoos for modular growth; add scenes over time without breaking flow.
- Tell your artist about clothing and daily routines so sleeve start and endpoints sit well under cuffs.
- Keep stencil tests and simplified concepts ready to protect intricate details and long-term clarity.
Tattoo Placement Guide for Anime Fans in the United States
Where you place your body art changes how the design moves, reads, and heals.
Arms and legs for portraits and action scenes
Forearms and calves give vertical space and flatter planes. They work well for portraits and dynamic poses from Dragon Ball or One Piece.
Tip: these areas reduce perspective issues and keep faces readable as you move.
Back and chest for cinematic layouts
Use broad, uninterrupted areas for sprawling dragons, battle spreads, or multi-character compositions.
Large layouts let an artist build depth and strong silhouettes without cramped details.
Wrists, ankles, and behind-the-ear: small but impactful
These spots suit symbols and micro pieces. They demand immaculate linework.
Be aware that movement and sun exposure speed fading and may need touch-ups.
Spots to rethink: hands, fingers, feet, and ribs
High-friction or constantly flexed skin often blurs thin lines and micro facial detail.
Make sure to discuss pain, healing logistics, and session timing with your tattoo artist so you can minimize strain and aftercare trouble.
“Great placement and a collaborative artist preserve silhouettes and reduce future retouches.”
- Choose smoother skin for better color saturation and edge retention.
- Collaborate with the right artist who understands body mapping and styles.
- Plan placements to protect key faces and focal points for years of wear.
Finding the Right Anime Tattoo Artist

Pick an artist who can turn flat screen art into confident, lasting ink on skin.
Specialization matters: anime art styles rely on exact outlines, facial proportion, and layered shading. An artist who repeats this work knows how to keep faces readable after healing.
Reading portfolios
Look for healed photos, not just fresh shots. Ask to see before/after pairs so you can judge line retention and color saturation.
Check consistency. Does the artist produce similar quality across multiple characters and fandoms? If one piece stands out but others blur, move on.
How to contact artists
- Be concise: state character, size, placement, palette, and timeline.
- Ask specific questions: “Do you have healed examples of similar work?” and “How do you adjust line weight for small faces?”
- Verify studio hygiene, licensing, booking, and revision fees up front.
“Waiting for the right artist often saves time and touch-ups in the long run.”
How to Vet Portfolios Like a Pro Before You Book
A great portfolio tells you more about long-term results than a glossy flash page.
Look for healed photos first. Studios that only show fresh work may be hiding rapid fading. Make sure you see 3–6 month healed examples of similar size and style.
Linework that stays crisp versus blown-out lines
Spot blowouts by checking edges. Fuzzy or bleeding outlines mean too-deep needle depth or poor skin handling.
Inspect eyes, hair tips, and emblems. If small features read clearly, the artist manages line hierarchy well.
Healed photo evidence and studio reputation
Check color packing and saturation. Flat or patchy fields signal weak ink packing and will age poorly.
Scan reviews for mentions of healed outcomes and aftercare. Patterns of issues point to inconsistent technique.
“Ask to see healed work of comparable size — that’s the real quality test.”
- Ask targeted questions: What needle groupings do you use for outlines? How do you prevent blowouts on fine lines?
- Request healed photos of comparable work and session notes.
- Compare two or three artists to confirm style fit and consistent execution.
Make sure to use these checks so you book the best artist and protect your ink over time.
Budget, Timeline, and Session Planning

A clear budget and realistic schedule protect quality and keep sessions focused.
What drives cost: larger sizes, dense color fields, and complex character linework add hours. Higher hourly rates reflect experience. Ask your artist for a staged plan so you can see costs per session.
- Sleeves: expect separate visits for outlines, shading, and color passes. Early palette decisions prevent rework.
- Multi-character pieces: schedule characters in separate sittings to judge healed contrast before adding more.
- Touch-ups: budget a follow-up months after healing to reinforce lines or deepen ink where needed.
Practical planning: deposits, reschedules, and travel add to the total. Make sure to block PTO and plan around healing windows so life and recovery don’t collide.
“Quality work prioritizes precision over speed.”
Small notes: small symbol ideas cost less but still need expert line planning. Ask for a session roadmap from your artist so you can plan time and money with confidence.
Consultation to Final Stencil: Prepping Your Anime Tattoo Design
A tight consultation turns scattered references into a clear, skin-ready plan.
Bring 3–5 clear references showing pose, expression, and color intent. Include any emblems or scene elements you want combined. Multiple angles help the artist judge volume and focal points.
References for characters and original concepts
Supply framed screenshots and clean art so the artist can extract crisp silhouettes. If you want a custom world, describe motifs and palettes. Experienced artists can fuse styles into a cohesive scene that reads well on skin.
Adapting screen art to skin: scale, contrast, and readability
Print and animation rely on light; ink depends on line hierarchy. Your artist will often thicken outer lines, simplify micro-details, and shift contrast so eyes, mouth, and hair spikes stay readable.
- Confirm stencil silhouette and spacing before inking.
- Discuss palette for your skin tone to keep saturation strong.
- Expect minor on-day adjustments to fit anatomy.
“A final stencil is a promise — check silhouette, focal hierarchy, and spacing before the first line.”
Aftercare and Long-Term Maintenance for Anime Tattoos
Healing your new piece correctly sets the tone for how it looks for years.
First two weeks: bandaging, cleansing, and moisturizing
Follow your artist’s bandage instructions and remove coverings when advised. For the first 72 hours, wash gently with unscented soap, rinse, and pat dry—no soaking or scrubbing.
Apply a thin layer of fragrance-free moisturizer 2–3 times daily. Keep the area clean and avoid picking scabs; this supports proper aftercare and helps lines heal crisp.
Sun exposure, sunscreen habits, and color preservation
UV light degrades ink quickly. Avoid direct sun for at least two weeks and cover the piece while it heals.
After healing, use broad-spectrum SPF to protect vibrant colors and prevent premature fading.
Touch-ups and when to schedule them
Friction from waistbands or sock cuffs can lighten ink during healing; plan clothing to reduce rubbing.
Watercolor anime tattoos and soft gradients often need touch-ups sooner than heavy-lined styles. Touch-ups are routine fine-tuning, not a failure.
Photograph your work at 2 weeks and again at 3 months to track progress. If you spot thin lines or patchy color, book a follow-up with your artist.
how long does a tattoo take to
“Keep skin hydrated year‑round; well‑moisturized skin keeps ink looking clear and bright.”
Common Mistakes That Make Anime Tattoos Age Poorly
Small choices during design and placement decide how your ink looks a decade from now.
A frequent error is packing too many fine details into a tiny piece. Eyes, hair strands, and small emblems merge as lines spread. That makes portraits and emblems unreadable after healing.
Weak contrast is another culprit. Energy auras and soft gradients without dark anchors flatten fast. Use bold anchors to protect silhouette and preserve color depth.
Placement matters. Fingers, hands, feet, and ribs wear faster from friction and movement. Delicate linework blurs in these spots and needs more touch‑ups.
- Don’t chase fleeting trends; choose compositions that read at arm’s length.
- Skip non‑specialists for complex faces — the best results come from an artist experienced in adapting styles to anatomy.
- Keep aftercare consistent: sun, dryness, and rubbing dull ink and soften edges.
“Review your piece with your artist periodically so small fixes stop big problems.”
Where to Find Anime Tattoo Artists and How to Reach Out

Start your search by tracking healed work, not just fresh photos, so you can judge how an artist’s lines age.
Search tips: explore Instagram tags by series (for example, One Piece), check studio directories, and look for healed examples in portfolios. Local shop websites often list guest artists and booking windows.
What if you don’t see an artist in your area?
If no specialist appears nearby, expand your radius and compare costs. Travel can be worth it for the best fit; add travel and lodging to session fees before you decide.
Also ask studios about guest spots. Your preferred artist may visit your city, which can lower travel time and still get you the style you want.
Featuring your work and communicating on platforms
When you message an artist, be concise. Attach references, note desired size and placement, list availability, and ask about deposit and booking windows.
- Outreach template: brief intro, links to references, size, placement, timeline, and whether you can travel.
- Follow-up etiquette: wait a reasonable time, then send a polite nudge with your original details rather than starting a new thread.
- Showcasing tips: submit clear, well-lit photos and include healed shots when possible. Credit the artist and studio in captions.
“Good outreach saves time — clear briefs let artists assess fit fast.”
Pro tip: keep a simple portfolio of your healed pieces as a client. It helps artists understand your skin’s healing and preferred styles when planning new work.
Conclusion
,
Finish smart: your final piece should read clearly, age well, and tell the story you want to wear.
Pick a strong concept from your favorite anime and hire a specialist who can translate characters into lasting body art. Focus on clean silhouettes, strategic contrast, and places that avoid heavy friction.
Protect your ink by following aftercare: moisturize, limit sun exposure, and accept touch-ups as normal maintenance. Adaptation by a skilled artist preserves identity better than exact duplication.
Celebrate original mixes—blend worlds or craft new scenes that reflect your life and fandom. Shortlist artists, gather references from One Piece to Dragon Ball, and book a consultation to start a confident plan.
Remember: the best tattoo is the one that still looks great a decade from now—designed well, executed by the right hands, and cared for with intention.