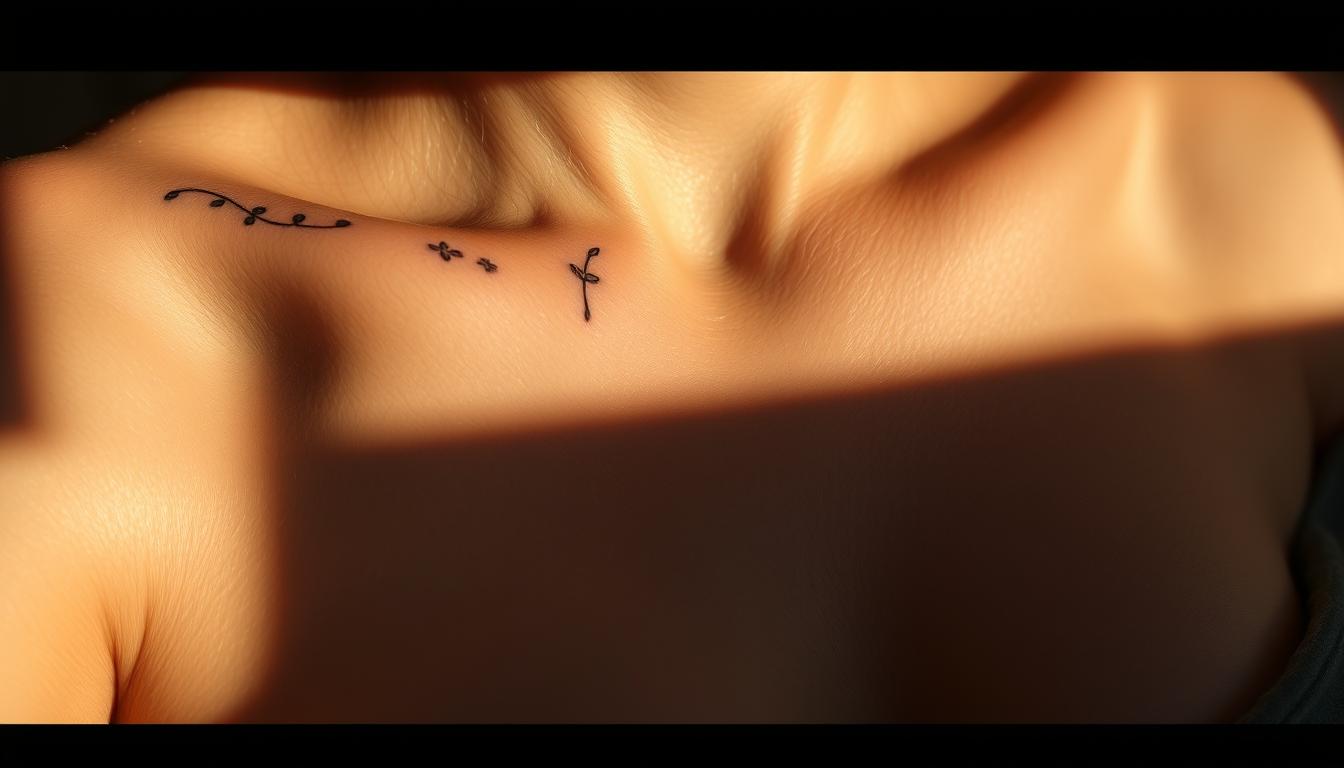
Have you ever wondered how a simple line or floral garland can change the way your neck and chest speak? We ask that because this area can act like jewelry on the body, framing the face and accenting movement.
We explore how the clavicle serves as a flexible canvas: small micro work, flowing pieces into the shoulder, or a chest-spanning statement. We share design directions—from fine-line elegance to painterly florals—so you can find inspiration that fits your life.
On session day, we recommend rest, hydration, and a full meal to help comfort and healing, advice echoed by Michigan-based artist Carrie Metz-Caporusso. Healing usually takes about four to six weeks, and one common aftercare mistake is letting ink dry out, says dermatologist Shari Marchbein.
In short, we set a roadmap: placement, scale, symmetry, and the choice of an experienced artist who knows how a piece moves with your body.
Key Takeaways
- Placement ranges from delicate to bold and works with many necklines.
- Plan scale and symmetry before your session for better long-term balance.
- Rest, hydrate, and eat a solid meal before you sit down.
- Expect 4–6 weeks of healing and avoid letting the area dry out.
- Work with an artist who understands contour and movement.
Why We Love Collarbone Tattoos Right Now
This year, small designs along the top of the chest have become a go-to for people who want art that feels like an accessory.
They read as refined and intentional. A delicate chain, a tiny butterfly, or celestial dot-work can boost your overall beauty without overwhelming your look.
We love how women-led trends—dainty dots, floral sprays, and micro script—have shaped an elegant minimalism that still feels inclusive.
- Placement enhances movement: ink catches light when you turn or raise an arm.
- Day-to-night versatility: hidden under a tee or framed by an off-shoulder top.
- Design range: from micro marks to elongated ornaments that run into the shoulder or chest.
Social inspiration often sparks ideas, but we recommend mixing trend cues with personal meaning—dates, symbols, or nature elements—to keep the piece timeless.
Understanding Placement: On the Bone, Along the Shoulder, or Into a Chest Piece

How a design sits — on the ridge, toward the side, or flowing into the torso — shapes how it looks, feels, and heals. We weigh practical choices so your piece reads like jewelry or becomes a larger upper-body story.
Subtle ink right on the clavicle
On-bone placement hugs the ridge and reads crisp from many angles. Small line work or micro script here looks refined and stays visible under different necklines.
Flowing from collarbone to shoulder and arm
Extending toward the shoulder creates movement that flatters the side profile and arm. We recommend designs that follow natural curvature so the piece ages cleanly.
Integrating into larger chest and body art pieces
Start small, plan big. A collarbone tattoo can act as a seed that later links into the chest for a cohesive composition.
“Placement is as much about future growth as it is about the first session.”
- Choose single-side or mirrored symmetry to balance scars or existing work.
- Consider visibility with clothing, jewelry, and hair length.
- Expect different pain along bone vs. softer tissue near the deltoid when we pick a spot.
Pain, Healing, and Aftercare on This Delicate Area
We want to set calm expectations: this spot sits over thin skin and bone, so line work and vibration can feel sharper than on fleshier areas.
How much does it hurt?
Many people choose smaller, simpler pieces to manage discomfort. Shorter sessions or planned breaks help when a collarbone tattoo includes dense lines or shading.
Dermatologist-backed aftercare
Keep it hydrated. A common mistake is letting new ink dry out. A gentle cleanse followed by thin layers of fragrance-free moisturizer keeps the skin barrier intact and reduces flaking and itch.
Realistic healing timeline
The typical window is about 4–6 weeks. Good care minimizes scabbing, preserves color, and keeps fine lines crisp as the area heals.
- Expect sharper sensation: thin skin over bone feels more intense.
- Comfort tactics: shorter appointments, breaks, and light numbing if advised by your artist.
- Movement-smart tips: wear loose necklines to avoid friction while healing.
- Sun and activity: avoid direct UV on fresh work; wait on gym, sauna, and swimming until sealed and stable.
| Stage | Action | Why it matters |
|---|---|---|
| Days 1–3 | Gentle wash twice daily, light moisturizer | Removes debris and keeps the skin barrier moist to prevent heavy scabs |
| Weeks 1–2 | Continue thin moisturizer, avoid soaking and sweating | Reduces infection risk and color loss from excessive peeling |
| Weeks 3–6 | Limit sun, use SPF after fully healed | Protects line crispness and long-term saturation |
For more on pain expectations and practical prep, we link to a detailed guide on how sensations vary and how to plan your session: how tattoos feel and how to manage.
Pre-Appointment Prep We Swear By

Before you sit in the chair, a few simple prep steps make the entire session calmer and safer. Per tattoo artist Carrie Metz-Caporusso, sleep, hydration, and a solid meal reduce fatigue and lightheadedness during the work.
Sleep, hydration, and a solid meal
Night-before checklist: get good rest, drink extra water, and eat a balanced dinner so your body holds steady the next day.
- Bring water and a light snack to keep blood sugar even while your artist works along the area.
- Avoid alcohol and blood thinners for at least 24 hours to limit excess bleeding and swelling.
- Choose easy clothing that lets an artist access the spot while keeping you comfortable and covered.
- In dry months, moisturize the skin lightly the night before so it’s not flaky on arrival.
- Gather clear reference images so the artist can estimate time and refine placement faster.
- Confirm your ID, payment method, and aftercare supplies to streamline the appointment.
- Plan your ride and post-session rest; wear loose tops so fresh ink won’t rub or irritate on the way home.
“A calm, prepared client helps the session go smoother and protects the final result.”
Budgeting Your Ink: Typical Collarbone Tattoo Costs
Knowing typical price ranges helps people decide whether to book now or save up for a session this year.
Small to medium pieces commonly fall between about $90 and $250. That range covers straightforward blackwork or a modest color element done in one short session.
What drives price up: design complexity, color choices, and session length. Work that follows bone and curve takes more time and care, and that can increase the hourly total.
- Ask about hourly minimums, deposits, and rescheduling fees before you book.
- Multi-session outlines and later shading add to the final invoice.
- Fine-line micro work may seem small but can cost more because of precision and possible touch-ups.
- Budget for aftercare supplies—cleanser, fragrance-free balm, and sunscreen for healed skin.
Our tip: get a written estimate that lists size, color vs. blackwork, and expected session time. Save for the specific artist you want; experience often shows in healed results and long-term satisfaction of the body art.
Collarbone Tattoo Ideas by Theme

Below are theme-led concepts that read like jewelry, small statements, or shoulder-spilling art.
Nature and florals
We pair cherry blossoms, peonies, orchids, and lavender into gentle arcs that follow the bone. Painterly blooms and light stems help the piece frame the neck without crowding the area.
Wildlife and sea life
Think a small bird perched in petals or a whale jellyfish duo rendered in soft gradients. These pairings work well when we keep scale modest and shading airy for clean healing.
Mythic and fierce
Dragons, tigers, and phoenix bring energy when scaled to the clavicle line. We recommend bold outlines with controlled fills so the drama reads clearly over time.
Celestial moods
Moon, sun, and star clusters make night-inspired stacks that look like jewelry. Keep trails and dots light so the elements sparkle rather than dominate.
Composition tips: start with one motif and plan future expansion. Ask your artist to test stencil curves so the design flows with your anatomy.
| Theme | Common Motifs | Best Approach |
|---|---|---|
| Floral | Cherry blossom, peony, lavender | Light stems, painterly fill, shoulder spill |
| Wildlife/Sea | Bird, koi, whale jellyfish | Soft gradients, paired elements, modest scale |
| Mythic/Celestial | Dragon, phoenix, moon & stars | Strong line weight, tested stencils, negative space |
Minimalist vs. Color Pop: Choosing Your Design Style
A minimalist line can feel like fine jewelry, while a burst of pigment turns the same spot into a statement.
Fine-line and blackwork elegance
We favor thin line weights for pieces that read crisp along the collarbone ridge. Small, precise marks age well and stay easy to style with clothing and jewelry.
Painterly color, pastels, and saturated blooms
Galleries show painterly bouquets and saturated hues that bring life to delicate motifs. Strategic color on petals, wings, or stars makes tattoos look more vivid without overwhelming scale.
- Contrast: test swatches so pigment harmonizes with your skin tone.
- Longevity: black ink often ages predictably; color needs sun care to stay bright.
- Hybrid option: a fine-line base with select color pops reduces upkeep.
- Time: color layering can add sessions compared with single-pass blackwork.
- Scale: keep detail moderate so the design reads clearly on the ridge.
Our tip: bring reference images and ask your artist for a tiny test patch to confirm saturation and contrast before committing.
Lettering and Script That Sit Beautifully on the Clavicle

We love how a simple line of text can read like jewelry when it follows the natural arc above the chest. Script that hugs the ridge feels intimate and keeps words legible from normal distance.
Quotes, single words, and meaningful dates
Short quotes and single words work best. Think phrases like “Fly Up” or “Carpe Diem” set in a light script. Dates and short sayings sit well when the overall design respects spacing so letters do not blur as the skin heals.
Roman numerals and delicate fonts
Roman numerals read cleanly when kerned with care. Choose a font with open counters and thin, steady strokes. We recommend testing a stencil at conversational distance to confirm legibility.
- Pair tiny symbols (a heart, star, or moon) to add rhythm without clutter.
- Mind spacing and kerning so letters keep definition as the ink settles.
- Discuss stencil height with your artist so chains and collars won’t rub fresh lines.
- Consider language and glyphs for visual interest while keeping clarity.
| Text Type | Best Font Traits | Why It Works |
|---|---|---|
| Single word/short quote | Open counters, light stroke | Stays legible at small scale and follows the curve |
| Roman numerals | Even weight, generous spacing | Timeless look, high contrast for clarity |
| Dates with motifs | Mix of fine script + small symbol | Personalized and balanced; small motifs add rhythm |
“Test the stencil across your movement—turn your head and lift an arm—so the script reads naturally.”
Feminine Collarbone Tattoo Ideas
Gentle floral sprays and winged accents bring a romantic note to the upper chest.
We curate graceful choices — black-and-pink butterflies, pink rose branches, and dotted halo accents that feel light yet expressive on the ridge.
Butterflies, roses, and dainty dotted designs
Butterfly placement flatters necklines and frames pendants for a jewelry-like effect. A single butterfly collarbone mark reads delicate over camis and under sweaters.
Petite bouquets and flower collarbone sprays sit like garlands without crowding the area. Fine needles keep petals and wing details crisp so they age gracefully.
- Dotwork halos to accent scripts or anchor tiny motifs while keeping a feminine beauty vibe.
- Palette ideas: soft blush, periwinkle, or classic blackwork to suit a range of complexions.
- Scale tips: two tiny florals can balance both sides with subtle symmetry.
| Design | Palette | Best Use |
|---|---|---|
| Black-and-pink butterfly | Black + blush pink | Frames necklaces; works solo or mirrored |
| Pink rose branch | Soft blush, muted green | Garland effect that follows the curve |
| Dotted halo | Black or soft gray | Accents script or anchors minimal pieces |
For inspiration on feminine butterfly work, see our feature on butterfly designs for women.
Masculine and Gender-Neutral Concepts

Strong iconography—snakes, thorns, and geometric sigils—lets a small mark carry big meaning. We outline bold concepts that work on one side or mirrored across both for balance.
Snakes, thorns, sigils, and ornamental bands
Snakes coiled with thorn branches read assertive without crowding the ridge. We use deliberate line weight and negative space so each element stays legible as the skin heals.
Ornamental bands can echo necklace lines for a structured, gender-neutral aesthetic. These bands look intentional under open collars and tees.
- Line weight: heavier outlines with thin interior strokes keep edges crisp along the bone angle.
- Blackwork shading: creates depth but avoids large solid fills on a small piece to prevent muddying.
- Mirroring: simple mirrored marks help if you plan to expand into a set later.
- Personal touches: a tiny sigil, coordinate, or minimalist symbol adds meaning without fuss.
- Session planning: short, focused passes yield crisper edges where vibration risks blur.
“Pick a stencil and test movement—turn your head and raise an arm—to confirm how the design sits.”
| Motif | Best Line Strategy | Wardrobe Match |
|---|---|---|
| Snake + thorn | Bold outer line, thin inner details | Open collars, crew tees |
| Geometric sigil | High negative space, symmetric strokes | Button-downs, layered chains |
| Ornamental band | Even weight, repeating rhythm | Works like necklace; pairs with minimal jewelry |
We aim to help people pick a piece that feels powerful and wearable. Plan placement on the side you prefer and schedule sessions that protect crispness and long-term clarity.
Symmetry vs. Asymmetry: One Side or Both?
Deciding whether to ink both sides or keep it solo shapes balance, wardrobe choices, and future expansion.
Mirrored pieces create a graceful, jewelry-like frame. Galleries often show sigils, mirrored snakes, and botanical garlands that read as a set. A pair balances necklaces and photographs well.
Single-side statements give editorial punch and make later additions easier. One bold mark can anchor a sleeve or co-exist with other work without feeling crowded.
Mirrored sets that read like a collar
Choose coordinated scale so two small designs look intentional, not random. Mirrored scripts or minimal florals can form a light collar effect without heavy coverage.
Picking the right side
Pick a side if you have scars, part lines, or existing ink to harmonize with. Test stencils standing, seated, and turning to see how the design moves with your body.
- Photo test: symmetry tends to read clean in images; asymmetry can feel more editorial.
- Leave room: plan expansion space if you may add work later.
- Wardrobe: mirrored sets play with necklines; single-side art pairs well with layered chains.
“Try the stencil in motion—turn your head and lift your arm—to confirm balance.”
Nature-Forward Pieces: Branches, Leaves, and Botanical Collars
Delicate leafy lines trace motion and frame the neck like a quiet garland.
We showcase branch-based collars that bend with the clavicle for a soft, organic silhouette. Olive branches, cherry blossoms, and gladiolus are popular options that read like wearable nature.
Spacing matters. Leaf shape and gaps prevent crowding and keep a botanical rhythm across the ridge. Small flowers punctuate stems without overwhelming fine-line work.
Choose lighter stems and tapered leaves so the piece heals and ages cleanly. You can pick a single arc or a soft split across both sides to frame a neckline.
“Reference real plants—photos of leaves and veins help your artist create believable curvature.”
| Motif | Best Fit | Color |
|---|---|---|
| Olive branch | Single arc, thin stems | Grayscale or soft green-gray |
| Cherry blossom | Split clusters, tiny blooms | Light pink accents or gray wash |
| Gladiolus | Vertical spill toward shoulder | Muted color or soft grayscale |
Our tip: bring plant reference photos and ask for tested stencils so the natural curve of the branch sits exactly where you want it.
Under-the-Collarbone and Shoulder-Collarbone Hybrids
Hybrid designs that start on the shoulder and spill toward the chest give motion to a still silhouette. We favor arcs of petals and leaves that cascade like fabric, so the piece moves when you lift an arm.
Flowy florals spilling from the shoulder
Floral arcs that flow from the shoulder to the collarbone create graceful contours. We test stencils with arm rotation so petals don’t pinch when you move.
Keep line weight light where the skin bends and a bit bolder on outward edges so shapes read at a distance.
Under-collar sparkle, jewelry, and chain illusions
Under-bone placements can tuck tiny chains or charm-like dots beneath the ridge for a necklace effect. Add a small moon and a few stars to bring a jewelry-meets-celestial art vibe.
Dot shading and thin strands help chain illusions look three-dimensional on curved surfaces.
- Balance bold shoulder work with lighter under-collar accents for harmony.
- Check neckline coverage so the hybrid peeks with intention.
- Aftercare: protect against bra straps and shoulder rotation during healing to keep lines crisp.
Trend Spotlight: Celestial, Jewelry, and Cybersigilism Looks
We see a rising trend that blends delicate chains with cosmic marks for a look that reads both antique and futuristic. These mixes let us play with scale, spacing, and tiny pops of color to keep pieces wearable.
Ornamental moons and celestial collages
We love lunar stacks, crescent filigree, and tiny star halos arranged as cohesive collages. Small clusters read like jewelry and capture a subtle night-inspired mood without heavy coverage.
Tip: use negative space so delicate detail doesn’t blur as it heals.
Necklace and chain “collar” illusions
Chain illusions curve with anatomy to act as permanent jewelry. Thin lines, tiny beads, and gem points work together to mimic necklaces that layer well with real chains.
Modern cybersigilism for tech-meets-organic vibes
Cybersigilism pairs symmetry, glitch lines, and biomech hints for a futuristic edge. We suggest restrained color on gems or cosmic accents and even a subtle dragons collarbone element as a playful nod.
- Space motifs: lunar arcs + star points for rhythm.
- Plan spacing to avoid bra straps and collar rub.
- Reference multiple designs so the composition feels personal and future-proof.
Collarbone Tattoos
Small motifs—like a pastel whale or a micro safety pin—can act like jewelry and add personality without heavy coverage. We showcase gallery highlights that pair marine life, subtle symbols, and soft florals into wearable accents that move with your body.
Whale & jellyfish duos and ocean wave scripts
We pair ocean motifs—whale and jellyfish duos—with airy wave scripts to tell a calm, marine story. Pastel gradients and a short word like Fearless can sit under a wave line and read like a private motto.
Snakes on sakura branches and safety-pin moments
Snakes resting on tiny sakura stems mix strength with delicate bloom details. Safety-pin elements and chain hints can look like jewelry without heavy ink, creating a curated, editorial vibe.
Hearts, stars, and tiny symbolic accents
We spotlight micro hearts and little stars as second-session accents. Staggered along the ridge, they form a constellation that still reads intentional at a glance.
- Keep scale small so marks remain legible and don’t look like smudges after healing.
- Use soft flowers to link separate motifs into a mini-garland.
- Test stencils in motion and under different necklines to see how pieces look like finished jewelry.
“Try the stencil with movement—turn your head, lift an arm—so placement feels natural.”
How to Work With a Tattoo Artist for a Custom Collarbone Piece
Show up ready: clear references and open conversation make the session smoother and the result truer to your idea. We treat the consult as a collaboration so your piece fits your body and lifestyle.
Bringing references and asking for permission to recreate
Organize references by composition, line weight, and texture so your artist can decode what you love. Bring clear photos and note what you want changed.
Etiquette: if you love someone’s exact design but can’t book them, ask the original artist for permission to recreate. Respect copyright and credit the source when appropriate.
“Ask before you copy—good artists protect their work and appreciate respectful clients.”
Planning placement for your body and skin tone
Test stencils in motion. We ask artists to place multiple angles along the ridge so the curve reads naturally when you turn or lift an arm.
- Tailor palette to your skin to boost contrast and long-term clarity.
- Review healed portfolios to see how fine lines and color age on different skin types.
- Clarify session scope—outline, shading, and color—so expectations match.
- Align aftercare: choose barrier-friendly cleansers and strict sun care for healed work.
- Leave room for future additions so this piece can grow with your plans and body.
Conclusion
Trust a clear vision and a skilled artist to turn a concept into a piece you’ll still love next year.
We recommend a short checklist: define your collarbone tattoo vision, gather references, and pick a design that ages well on your skin.
Think about scale — a small on-bone mark or a shoulder-to-chest arc can both read intentional depending on your wardrobe and life.
Timeless motifs like flowers, a tiny bird, a heart, moon accents, or subtle butterflies often look like jewelry and layer well with future work.
Protect fresh ink: nourish the area, avoid drying it out, and use sun protection once healed. For more inspiration and gallery examples, see our beautiful back gallery.
Work with your artist, trust the process, and plan a piece that fits your body and feels like you — now and for years to come.