What’s the one mistake everyone makes when removing acrylic nails at home? Hint: It’s not impatience—though that doesn’t help. The real danger lies in underestimating how delicate your natural nails are beneath those bold extensions.
Ripping, peeling, or forcing off artificial enhancements might seem quick, but it’s a recipe for disaster. These shortcuts can leave your nail beds cracked, thin, or even infected. Healthy natural nails require careful handling, whether you’re heading to a salon or tackling removal yourself.
While professionals use specialized tools and techniques, at-home methods can work—if you prioritize safety. This guide walks you through options like acetone soaking and alternative strategies, all designed to minimize harm. Expect the process to take time (at least an hour) and focus on gradual steps. Rushing risks weeks of brittle, peeling nails that need intensive recovery.
Key Takeaways
- Proper removal prevents long-term damage to natural nails
- Salon services offer the safest approach for delicate nail beds
- At-home methods require acetone, patience, and gentle tools
- Avoid shortcuts like biting or peeling to maintain nail strength
- Allocate 60+ minutes for a careful, thorough process
- Post-removal nail care is crucial for recovery
Introduction to Acrylic Nail Removal
The secret to keeping your nails healthy lies in proper acrylic removal. Unlike regular polish, these enhancements bond tightly to your natural nail plate. This strength makes them durable—but also tricky to remove safely.
Understanding the Need for Safe Removal
Nail technicians often compare acrylics to concrete—they’re built to last. Rushed removal can split layers of your natural nails, leaving them paper-thin. Over 60% of DIY attempts result in visible damage, according to salon surveys.
Why take chances? Peeling or prying lifts chunks of your nail surface. This creates ridges and weak spots that take months to grow out. Even minor tears can lead to infections if bacteria seep under the nail bed.
| Method | Time Required | Risk Level | Cost Range |
|---|---|---|---|
| Salon Service | 45-60 mins | Low | $15-$30 |
| At-Home Process | 60-90 mins | Moderate | $8-$15 |
Overview of the Process and Expected Outcomes
Proper removal involves dissolving the acrylic layer by layer. You’ll need acetone, cotton pads, and a lot of patience. Expect some dryness afterward—this is normal and temporary.
Success means intact nail beds with minimal filing marks. Your natural nails might feel slightly softer for 2-3 days. Use nourishing oils immediately to restore strength and prevent peeling.
Tools and Prep: Setting Up Your At-Home Salon

Your kitchen table can become a nail studio—if you prep properly. Gather these seven essentials to avoid mid-process scrambles:
Essential Tools and Materials
Pure acetone outperforms regular nail polish remover for dissolving stubborn enhancements. Pair it with cotton balls for maximum absorption. A dual-grit nail file (100/80 grit) helps safely reduce bulk without shredding your natural plate.
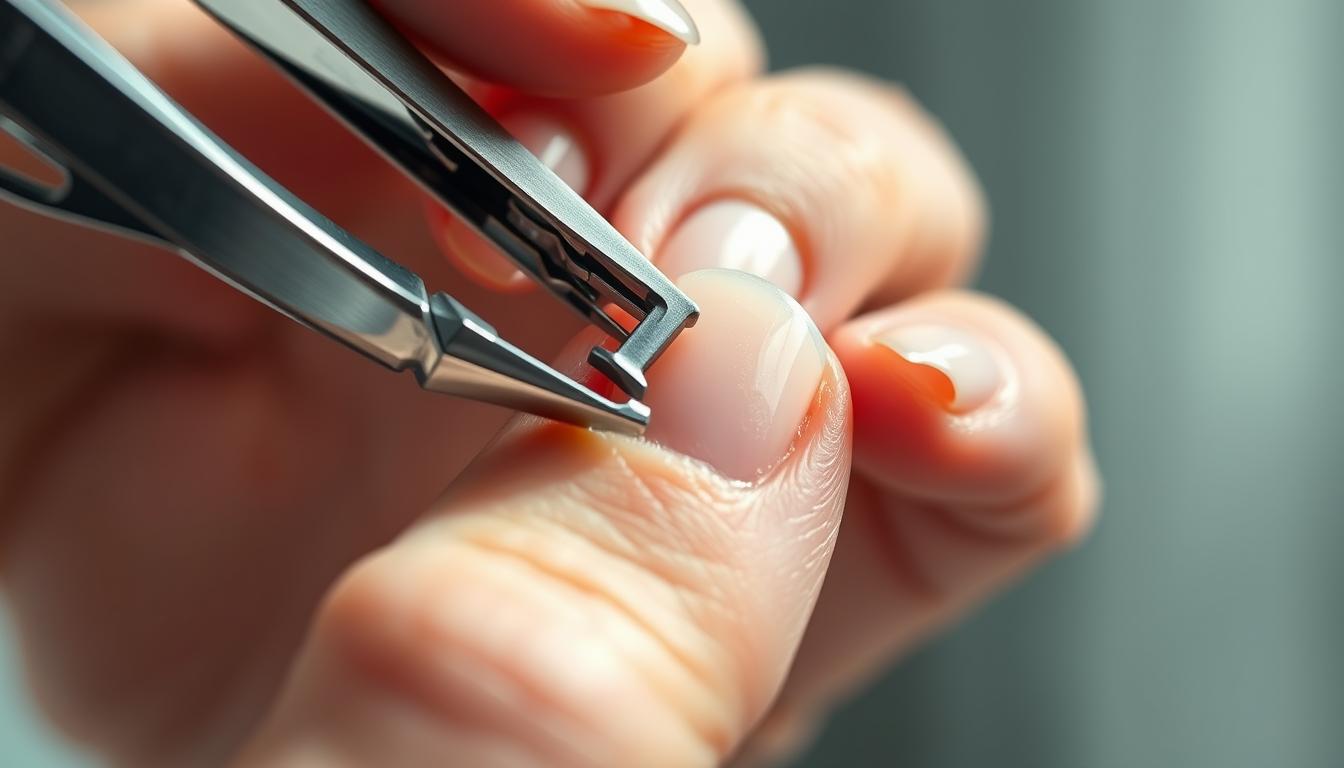
- Sharp nail clippers for trimming length
- Metal cuticle pusher to lift edges gently
- Aluminum foil or silicone clips for secure soaking
- Small glass bowl for warm acetone baths
| Tool | Purpose | Pro Tip |
|---|---|---|
| Nail buffer | Smooths residual texture | Use after removal |
| Petroleum jelly | Protects skin from acetone | Apply around cuticles |
| Towels | Contains spills | Layer under workspace |
Creating a Clean, Ventilated Workspace
Acetone fumes pack a punch—open windows or run a fan nearby. Cover surfaces with old towels to catch drips. Keep your short pink acrylic nails dream alive by storing tools in one designated spot.
Organize items left to right: clippers, file, acetone, cotton, pusher. This workflow minimizes mess and maximizes efficiency. Wipe down tools post-use with alcohol to maintain hygiene.
How to Get Acrylic Nails Off: Step-by-Step Process

Proper prep work makes all the difference in artificial enhancement removal. Strategic trimming and filing create a safe foundation for the next steps while protecting your natural nail plate.
Initial Clipping and Filing Techniques
Grab sharp clippers and trim extensions to about ¼ inch above your nail bed. This reduces leverage that could cause accidental tears. Switch to a 100-grit file to sand off the glossy topcoat—you’ll know you’re done when the surface turns matte.
Work in one direction using medium pressure. Remove 70-80% of the acrylic bulk but leave a translucent layer. Pro tip: Check progress by looking sideways—if you see your natural nail’s curve, stop filing.
| Stage | Tool | Goal | Time |
|---|---|---|---|
| Length Reduction | Clippers | Minimize leverage | 3 mins/nail |
| Surface Prep | 100-grit file | Remove sealant | 2 mins/nail |
| Bulk Removal | Coarse file | Thin acrylic layer | 4 mins/nail |
Preparing for the Acetone Soak
After filing, your enhancements should feel rough but flexible. Wipe nails with alcohol to remove dust—this helps acetone penetrate better. Apply petroleum jelly around cuticles to prevent drying.
Notice any remaining shiny spots? Give those areas another quick file. Remember: More acrylic removed now means less soaking time later. You’re ready for dissolution when nails look evenly frosted with no glossy patches.
Acetone Soaking and Alternative Techniques

Your fingertips deserve a spa day—even during enhancement removal. Whether you choose traditional acetone methods or gentler approaches, the goal remains the same: dissolve bonds without damaging delicate surfaces.
Cotton Ball and Foil Method Explained
Saturate cotton balls with pure acetone until damp. Press one onto each nail, then wrap fingertips tightly with aluminum foil. Wait 15-20 minutes—the foil traps fumes for faster breakdown. Gently twist the wrap to test if enhancements lift easily.
| Method | Tools | Time | Effectiveness |
|---|---|---|---|
| Foil Wrap | Cotton, foil | 15-25 mins | High precision |
| Bowl Soak | Glass bowl | 20-30 mins | Full immersion |
Exploring Acetone-Free Options
For sensitive skin, try acetone-free polish remover with ethyl acetate. Soak nails for 40+ minutes, gently scraping softened layers. Note: This works best on thin acrylic applications.
Nail drills require professional skill—incorrect use can sand natural plates too thin. Avoid viral hacks like dental floss or hot water. These often cause more peeling than progress.
Caring for Your Natural Nails During Removal

Your natural nails need TLC during this delicate phase. Gentle handling preserves their strength while removing enhancements. Think of it like peeling a sticker off glass—too much force leaves residue or cracks.
Preventing Damage to Nail Beds
Grab your cuticle pusher or orange stick. Start at the base near your cuticle and slide toward the tip. If acrylic resists, stop immediately—it needs more soaking time. Forced removal creates microscopic tears in nail beds.
Work one nail at a time. Wipe tools between uses to prevent debris buildup. “The goal is zero pressure,” says nail artist Lena Choi. “Let the acetone do the heavy lifting.”
| Tool | Proper Use | Warning Signs |
|---|---|---|
| Cuticle pusher | 45-degree angle push | Visible nail bending |
| Orange stick | Light scraping motions | White stress marks |
Post-Removal Buffing and Shaping
After removal, buff nails using clockwise circles with a 180-grit file. Check for rough patches by running your thumb across surfaces. Avoid over-buffing—your natural nails should feel smooth, not paper-thin.
Wash hands with lukewarm water and mild soap. Pat dry thoroughly before applying jojoba oil. Notice ridges or peeling? Skip polish for 48 hours to let nail beds recover.
“Healthy nails flex slightly when pressed. If they feel brittle, prioritize moisture over cosmetics.”
Expert Tips and Safety Precautions

Licensed nail technicians share secrets most DIYers miss. Their expertise transforms risky removals into safe processes. Let’s explore professional strategies that balance efficiency with nail health.
Advice from Licensed Nail Artists
70-proof acetone works twice as fast as drugstore removers. “Lower concentrations prolong soaking time,” explains manicurist Tia Morales. “Test readiness by gently nudging enhancements—if they resist, wait 5 more minutes.”
Nail techs prefer silicone clips over foil wraps. These tools create airtight seals without sharp edges. They also rotate tools between clients to prevent contamination.
Protecting Your Skin and Cuticles
Slather petroleum jelly around nails before starting. This barrier prevents acetone from drying out your skin. Reapply cuticle oil every 15 minutes during soaking.
| Factor | DIY Approach | Salon Service |
|---|---|---|
| Cost | $8-$15 | $10-$20 |
| Tools | Cotton/foil | Electric files |
| Safety | Moderate risk | Professional oversight |
Ventilation matters. Open windows or use fans to disperse fumes. If polish remover stings your hands, pause immediately. Rinse with cool water and moisturize.
Addressing Challenges and Troubleshooting
Even with careful preparation, unexpected issues can arise during nail removal. Recognizing these challenges early helps protect your natural nails from harm. Let’s explore solutions for common roadblocks.
Common Pitfalls and How to Avoid Them
Rushing the process tops the list of mistakes. If enhancements resist peeling after 30 minutes of soaking, add more time—don’t force them. Regular polish remover lacks the strength of pure acetone, leading to incomplete dissolution.
Avoid viral hacks like dental floss or dish soap. These often cause jagged edges that tear nail beds. For acrylic nails home removal, stick to proven methods: proper filing and adequate soaking.
When to Consider Professional Help
Persistent pain or redness signals trouble. Thick gel layers might require electric files only salons possess. If removing acrylics leaves nails paper-thin or bleeding, visit a technician immediately.
Grown-out lifts and infections demand expert care. Professionals safely address these issues while preserving nail strength. Remember: temporary convenience isn’t worth months of recovery.