Imagine waking up to flawless nails day after day—no chipping, no lifting, just salon-worthy perfection. Sounds impossible with adhesive manicures? Think again. With the right approach, your temporary nails can rival even the most expensive acrylic sets.
Modern adhesive options offer more durability than ever. Yet most people miss one critical step: preparation. Roughing up the natural surface, cleansing oils, and selecting the perfect size aren’t just suggestions—they’re game-changers.
You’ll find that technique matters more than the brand you choose. Skip the quick-stick method. Instead, apply gentle heat for better adhesion. Avoid water exposure for two hours post-application. These small tweaks add days to your manicure’s lifespan.
Key Takeaways
- Proper nail prep doubles wear time
- Adhesive choice impacts longevity
- Size selection prevents premature lifting
- Post-application care ensures durability
- Avoid common mistakes like rushing steps
Ready to ditch constant touch-ups? What follows isn’t just a tutorial—it’s your ticket to two-week wear without salon prices. Let’s transform how you think about at-home beauty solutions.
Understanding Press-On Nails

Press-on nails offer instant glam without salon appointments or hefty prices. These acrylic enhancements stick directly to your natural nail bed using adhesives like glue or stickers. Unlike traditional manicures, they arrive ready-to-wear with intricate patterns and shapes that suit any occasion.
What Are Press-On Nails?
Crafted from durable acrylic material, these temporary covers mimic professional nail art. Each set comes pre-shaped and painted—think marble swirls, holographic glitter, or minimalist French tips. You can file them to match your nail curvature or personal style. “They’re like jewelry for your fingertips,” says beauty influencer Jenna Lyons.
Benefits of a DIY Manicure
Save both time and money. A single $15 set often lasts multiple applications, while salon visits average $50 weekly. No drying time means you can apply them during lunch breaks. Plus, swapping designs takes minutes—perfect for matching outfits or moods.
Customization options let you mix lengths or combine patterns from different sets. Seasonal collections keep your look fresh year-round without commitment. Whether you prefer subtle neutrals or bold animal prints, there’s a style for every personality.
Preparing Your Natural Nails

The secret to long-lasting adhesive manicures starts before you even open the glue tube. Your natural nails need a blank canvas—free from oils, polish residue, and uneven surfaces.
Cleaning and Buffing Your Nails
Begin by soaking cotton pads in pure acetone. Rub each nail bed thoroughly to dissolve old polish and strip away invisible oils. “Acetone works better than regular remover because it dehydrates the surface,” notes celebrity manicurist Zoe Martinez. Dry hands completely before moving to the next step.
Grab a 180-grit buffer and lightly scrub each natural nail in one direction. This creates microscopic grooves without weakening your nail plate. Avoid sawing motions—three gentle passes usually suffice.
Effective Cuticle Care
Overgrown cuticles create bumps that prevent flush adhesion. Use an orange stick to push back skin around your nail bed. Never cut live tissue—this leads to infections and uneven edges.
| Step | Proper Technique | Result |
|---|---|---|
| Acetone Use | Full 60-second rub | Oil-free surface |
| Buffing | 3 light strokes | Textured grip |
| Cuticle Work | Push, don’t cut | Smooth base |
Finish by wiping nails with alcohol wipes. This final cleanse removes dust particles from buffing. Let hands air-dry completely—moisture is the enemy of strong adhesion. Your natural nails are now ready for flawless press-on application.
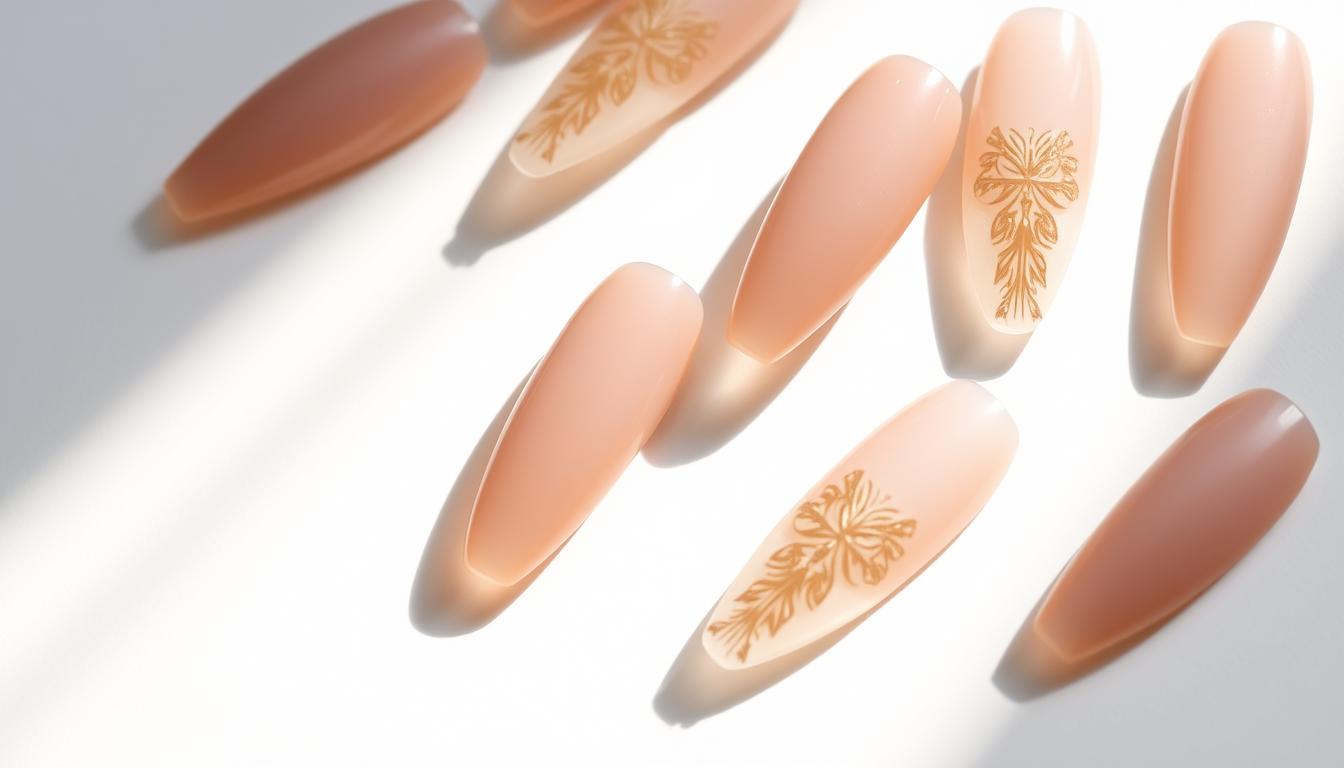
Choosing the Right Press-On Nail Size and Style

Flawless application begins with precision sizing. Your natural nail shape dictates which press-on styles will blend seamlessly. A mismatched set creates tension points that lead to premature lifting.
Finding Your Perfect Fit
Start by laying out all sizes from the kit. Compare each piece to your bare nail beds. “The ideal match covers 90% of your natural surface without touching skin,” advises nail tech Marco Rivera. If edges extend beyond your cuticles, downsize.
For wider nail beds, try these tricks:
- Flip oval-shaped pieces sideways
- Use square styles as diagonal options
- File curved edges for custom widths
Coffin and stiletto shapes require extra attention to sidewall alignment. Press the center first, then gently smooth toward the edges. If you hear cracking sounds during application, the size is too narrow.
| Nail Shape | Best For | Lifespan |
|---|---|---|
| Round | Short beds | 10-14 days |
| Almond | Slender fingers | 7-10 days |
| Squoval | Wide tips | 12-16 days |
Curvature matters more than most realize. Flat press-ons create air pockets on arched nails. Bend each piece slightly before applying—if it resists flexing, it won’t conform to your natural shape. This simple test prevents 80% of fit issues.
Selecting High-Quality Glue and Adhesives

Your manicure’s lifespan hinges on one critical decision: choosing the right bonding agent. While press-on nails come with pre-applied adhesive, upgrading to professional-grade products can triple their staying power.
Double Gluing Techniques
Apply a rice-sized drop of nail glue to your natural nail. Immediately add another layer to the press-on’s inner curve. Wait 10 seconds until both surfaces turn tacky. “This dual-layer method creates a chemical handshake between surfaces,” explains chemist Lila Moreno.
Press firmly for 30 seconds, rolling from cuticle to tip. Avoid repositioning once contact occurs. For extra security, try pink and white designs with reinforced edges that distribute pressure evenly.
Avoiding Common Adhesive Mistakes
Thick glue globs create weak spots. Instead, spread thin layers using the bottle’s precision tip. Humidity slows drying time—work in air-conditioned spaces during summer months.
| Adhesive Type | Best Use | Average Hold |
|---|---|---|
| Brush-On Glue | Detailed control | 14-21 days |
| Pre-Cut Tabs | 24-hour events | 12-36 hours |
| Gel Adhesive | Sensitive nails | 7-10 days |
Store unused glue upright in cool, dark places. Heat degrades cyanoacrylate formulas faster than expiration dates suggest. When removing press-ons, never peel—this damages your natural nail and weakens future adhesion.
Proper Application Techniques for Press-On Nails

Achieving salon-quality adhesion requires more than sticky tabs and hope. The difference between a three-day manicure and two-week perfection lies in your application process. Let’s break down professional methods that create ironclad bonds.
Mastering Pressure Distribution
Position each piece at a 45-degree angle against your cuticle. Roll it downward like closing a car door—this motion pushes air bubbles out. Hold the center firmly for 20 seconds while gently squeezing the sides. “The pinch-and-hold method creates vacuum-like suction,” explains nail artist Tori Blackwell.
- Use thumb and index finger to compress sidewalls
- Maintain steady pressure—no peeking!
- Wipe excess glue immediately with acetone-dipped orange stick
Strategic Installation Sequence
Apply pieces in this order for optimal results:
| Left Hand | Right Hand | Benefit |
|---|---|---|
| Thumb | Thumb | Establishes grip pattern |
| Index | Index | Prevents smudging |
| Middle | Middle | Maintains dexterity |
Alternating hands lets glue set properly between applications. Complete one nail fully before moving to its counterpart. This staggered approach reduces accidental shifts during the bonding window.
Watch for these signs of successful adhesion:
- No visible gaps at cuticle line
- Uniform glossy finish
- Zero movement when gently tugged
how to make press on nails last
Your dream manicure doesn’t end at application—it thrives through smart maintenance. Professionals know durability comes from combining strategic choices with simple weekly habits.
Shape Matters More Than Length
Short, rounded edges resist snagging better than dramatic stilettos. Almond or oval shapes glide smoothly through daily tasks. Square tips work too—just file corners slightly to prevent catching.
After seven days, refresh color with a thin top coat. Gel formulas add protective shine without bulk. For blank sets, try pink acrylic designs cured under UV light. This seals polish like salon gel extensions.
Spot lifting early? Dab glue beneath edges before gaps widen. Avoid hot tubs and heavy lifting for 24 hours post-application. These tweaks help temporary sets rival permanent options.
Remember: Your lifestyle dictates success. Office workers can rock longer styles, while active folks thrive with shorter tips. Match your habits, and those gorgeous nails will stay put.