What if everything you’ve heard about removing acrylic extensions yourself was half-true? While professionals often warn against DIY attempts, the reality is that safe removal at home is achievable—if you know the secrets most tutorials won’t tell you.
Those dazzling manicures come with a catch: improper removal can leave your natural nail beds brittle and damaged. Yet with the right approach, you can preserve your nail health while saying goodbye to grown-out acrylics. This isn’t about quick fixes—it’s about strategic care that respects your body’s canvas.
Your toolkit matters more than you think. Pure acetone becomes your ally here, working gently to dissolve the acrylic bonds without aggressive scraping. Expect to dedicate 60-90 minutes—rushing leads to peeling layers and sensitivity. Those viral “hacks” using household items? They often cause more harm than good.
This guide reveals the professional-grade techniques manicurists use, adapted for home use. You’ll learn why prep work like filing matters, how to create an effective soaking setup, and when to recognize it’s time to stop and seek help. Let’s transform what sounds intimidating into an empowering self-care ritual.
Key Takeaways
- Professional-grade removal requires pure acetone and specialized tools
- Allocate 60-90 minutes for safe, damage-free results
- Filing before soaking accelerates the process
- Never force separation—patience prevents nail trauma
- Post-removal nail recovery takes 2-4 weeks
Understanding Acrylic Nails and Their Removal Process

Ever wonder why some manicures last weeks while others chip quickly? The answer lies in acrylics’ unique chemistry. These enhancements aren’t just polish—they’re a science experiment on your fingertips.
What Are Acrylic Nails?
Acrylics form when liquid monomer meets powder polymer, creating a putty-like substance that hardens into armor for your natural nails. This fusion creates remarkable durability—perfect for those wanting extra length or strength. But that same toughness becomes a challenge during removal.
Risks and Common Pitfalls
Dermatologist Dana Stern, M.D., notes: “Peeling, white patches, and brittle texture signal it’s time to give nails a break.” Rushed removal often leads to:
- Layered splitting in nail plates
- Dry, irritated cuticles
- Painful keratin granulation (those chalky spots)
Nail expert Nadine Abramcyk warns that damaged nail beds can require months of recovery. Acetone works by dissolving acrylic bonds, but impatience here risks tearing delicate layers. Those viral “quick removal” methods? They’re usually shortcuts to regret.
Smart removal respects both chemistry and biology. Your nails deserve care that maintains their integrity while transitioning back to their natural state.
Preparing Your At-Home Salon Setup

Transforming your kitchen table into a nail studio starts with smart preparation. Professional results demand salon-grade organization—think like a technician arranging their workstation. Your success hinges on two pillars: precise tools and a breathable environment.
Gathering Essential Tools
Begin with sharp nail clippers to trim extensions—dull blades cause jagged edges. A dual-grit nail file (100/80 grit ideal) tackles bulk acrylic removal. Pair it with a buffer for final smoothing.
Pure acetone outperforms regular removers, dissolving bonds in half the time. Stock lint-free cotton pads for efficient soaking and aluminum foil for secure wraps. An orangewood stick or cuticle pusher becomes your gentle lifting tool.
Most products live at drugstores—no specialty orders needed. Grab a small bowl if submerging fingertips.
Establishing a Safe, Ventilated Workstation
Fold towels under layered paper sheets—acetone stains vanish with this barrier. Position fans toward open windows; fumes trigger headaches in enclosed spaces.
Arrange tools left to right: clippers, file, cotton, acetone, pusher. This workflow mirroring salon stations prevents frantic searches mid-process. Set timers visible from your seat—no acetone-breath sprints to check phones.
Your home setup now rivals professional spaces. Breathe easy knowing you’ve eliminated common DIY hazards.
Step-by-Step: How to take off acrylic nails

Your journey to natural nails begins with smart preparation. Strategic trimming and filing create the foundation for stress-free removal—think of it as setting the stage for your nails’ comeback tour.
Mastering Precision Trimming
Grab sharp clippers and trim extensions to 2cm above your natural nail bed. This golden rule prevents accidental cuts while eliminating bulk length. Remove colored polish first—acetone works for regular lacquer, while gel requires coarse filing to break its seal.
Switch to your 100-grit file. Work in single strokes across the surface, not sawing motions. “Imagine you’re dusting snow off a car hood—gentle sweeps preserve what’s underneath,” advises nail technician Lola Ruiz. File until you see a thin acrylic layer remaining—your safety net against sensitive nail beds.
Customizing Your Approach
Thicker acrylics? Prioritize filing over soaking. Delicate nails? Preserve more material for acetone to handle. Always consider:
- Original application thickness
- Your natural nail strength
- Time available (thorough filing cuts soak time by 50%)
Remember—rushing leads to regrets. Those extra minutes spent filing properly pay dividends in nail health preservation. When done right, your tips should feel slightly textured but uniformly thin, ready for the next phase.
Effective Acetone Soaks and Alternative Approaches

Acetone sparks debates in beauty circles—villain for its harshness, hero for its effectiveness. Let’s cut through the noise. This solvent works like a molecular locksmith, breaking acrylic bonds through science, not force.
Pure acetone (70-proof or higher) dissolves enhancements fastest. Drugstore options below 70-proof still work but demand extra patience—sometimes doubling soak times. Your choice depends on nail thickness and personal tolerance.
| Method | Time Required | Tools Needed | Pro Tip |
|---|---|---|---|
| Cotton & Foil | 10-15 minutes | Cotton pads, aluminum foil | Use remover clips for easier wrapping |
| Bowl Submersion | 20-30 minutes | Shallow dish, acetone | Rub nails gently underwater |
| Non-Acetone | 40+ minutes | Alcohol-based remover | Multiple applications needed |
Balancing Power and Care
Speed comes with tradeoffs. High-grade acetone lifts acrylics in 15 minutes but dries cuticles. You’ll need post-soak hydration—jojoba oil works wonders. For sensitive skin, try barrier creams around nails before soaking.
Warmth accelerates results without risks. Place foil-wrapped hands under a towel soaked in hot water. Never microwave acetone—flammability dangers outweigh time savings. Bowl users can set their container on a heating pad set to low.
Non-acetone removers offer gentler alternatives. They’re ideal for removing regular nail polish but struggle with acrylics. If switching, expect longer sessions and possible leftover residue needing manual removal.
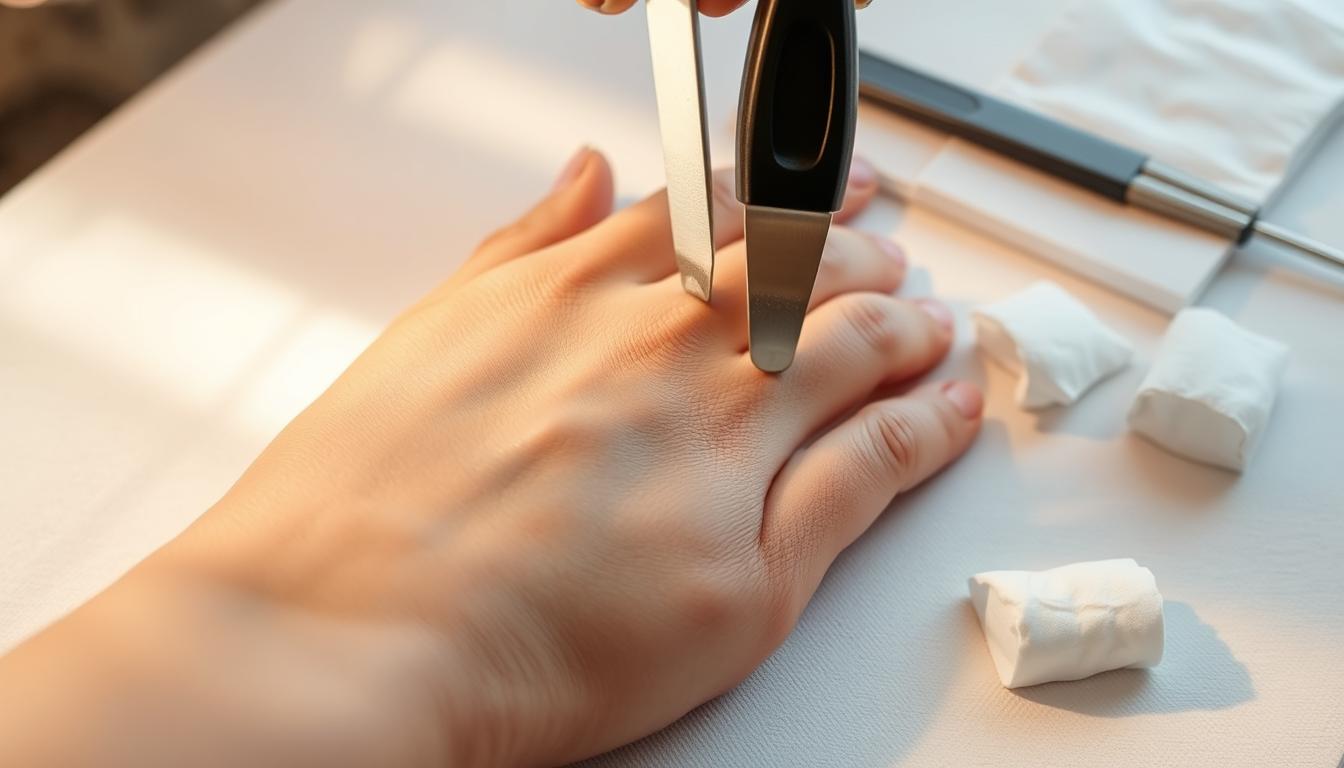
Safely Pushing Off Acrylics and Removing Residue
The magic happens when acetone transforms hardened acrylics into a pliable state. Watch for that telltale gooey texture—nature’s green light for gentle removal. This phase demands the precision of a sculptor and patience of a monk.
Proper Use of a Cuticle Pusher or Orange Stick
Position your cuticle pusher at the base where natural nails meet enhancements. Glide upward toward the tip, letting softened material roll off like dough. If resistance occurs, stop immediately—your nail beds deserve respect.
Wooden orange sticks offer forgiveness for beginners, while metal tools provide control for veterans. Always angle instruments parallel to your nails to avoid gouging. Stubborn bits? Re-soak for five minutes rather than forcing separation.
Post-removal, buff away residue using light circular motions. Hydrate cuticles with oil to combat acetone’s drying effects. Remember: rushing now means weeks of peeling layers later. Your natural nails will thank you for this careful dance between persistence and restraint.