Strong, bold choices can say more than words.
Have we ever stopped to ask what a small symbol at the throat can do to our look and confidence?
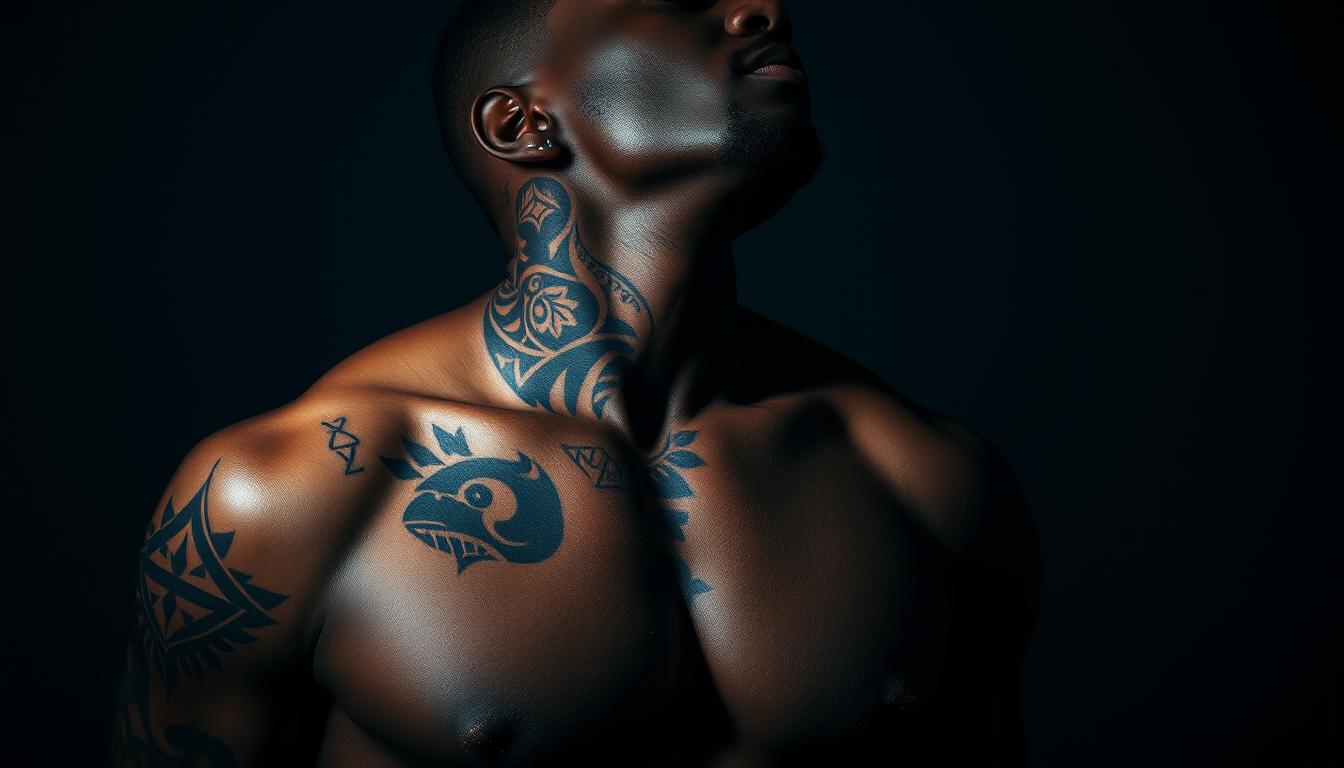
We set the stage by celebrating the way visible ink becomes a modern statement. In 2025 we see designs from subtle lower pieces to full wraps that demand planning and care.
Placement changes everything — front pieces are highly visible, side work can flow behind the ear, and the back of the neck lets us conceal or reveal with hair and clothing.
We also cover how saturated ink and crisp lines make motifs like lion, crown, phoenix, or compass pop on melanin-rich skin. Sun exposure and movement shape how these pieces age, so aftercare matters.
Key Takeaways
- Decide visibility first: subtle lower pieces or bold full-wrap designs.
- Choose imagery that matches your life, power, and personal story.
- Saturated ink and clean lines work best on melanin-rich skin.
- Sun protection and moisturizer keep work looking strong over time.
- Plan with an artist who shows consistent healed neck work.
Why Neck Tattoos Make a Bold Statement for Us Today
The area around the throat has become a high-impact canvas for confidence and craft. In 2025 we see looks that range from tiny, minimalist marks to dramatic, full compositions that turn heads. Visibility shifts with placement: front pieces demand attention, side work can stay subtle, and the back can hide or reveal with hair or collars.
We pick designs that match our day-to-day life and goals. Simple pieces whisper sophistication; larger layouts broadcast stories and values. High-visibility ink often reinforces commitment and reminds us why we chose this path.
Fashion and grooming shape the final effect — collars, chains, and hair length change how a piece reads. Our practical tips: start small on the side or lower area, prioritize clean lines, and plan future additions so the whole stays balanced.
- Fit over trend: choose work that suits your life.
- Plan: cohesive layout saves time and touch-ups later.
Neck Tattoo Placements: Front, Side, Back, Lower, and Full Wrap

Each placement around the throat carries its own vibe—some demand attention, others whisper when you move. We break down zones so you can match visibility, comfort, and long-term care to your style.
Front impact and symmetry
Front pieces offer the most high-visibility effect. Centerline designs echo natural anatomy and feel balanced.
Tip: pick shapes that complement your jaw and keep the area moisturized to help lines heal clean.
Side flow and cover-up ideas
The side works well for detailed work and behind-the-ear flow. Lines can follow hair growth or collar bones.
Geometric overlays and nature forms make strong cover-up ideas to mask older marks while keeping direction and movement.
Back alignment and versatility
Work that sits at the back aligns with the spine and can be hidden or shown with hair or collars.
Use negative space to keep the piece breathable under shirts and chains, and protect it from sun exposure.
Lower subtlety and full-wrap planning
The lower area is subtle and ideal for micro-motifs that peek out with motion. It keeps intrigue without full commitment.
Full wraps demand a cohesive map across jaw, throat, and clavicles. Plan iterative build-outs with a skilled artist to avoid crowding and keep readability from all angles.
- Comfort: throat placements can feel spicier due to thin skin and nerves; side and lower zones are often milder.
- Healing tips: avoid tight collars, reduce friction, moisturize lightly, and use SPF once healed.
neck tattoos for black men
On melanin-rich skin, contrast and saturation decide how a piece reads. We pick deep blacks and jewel tones to keep edges sharp and details visible.
Designs that pop use saturated blacks and selective color—deep reds, blues, and gold highlights—so lines stay crisp over time.
Line weight matters. Medium-to-bold strokes outlast ultra-fine needles on the throat. Bolder lines keep shapes clear as the years pass.
Line weight, contrast, and color choices that last
Balance black-and-gray anchors with color pops to avoid muddy blends. Side placement works well for geometric and nature-inspired cover-ups.
Aftercare keeps saturation strong. Use fragrance-free moisturizers while healing and daily SPF once healed to prevent fade.
- View stencils under varied lighting to confirm contrast.
- Ask an artist skilled with darker skin tones about needle choices and dilutions.
- Prefer textured frameworks for effective cover-ups.
We recommend collaborating closely with a trusted artist so your tattoo, colors, and placement age well. These simple tips help tattoos look deliberate and last.
Trending Design Ideas We Love Right Now

A single, well-placed symbol can become the seed of a larger composition that still reads clean and intentional.
Minimal to intricate: from small symbols to statement pieces
We favor crisp micro-symbols on the side neck like arrows, numerals, and tiny stars that grow into mapped work over time.
Front neck seals — crowns, roses, and geometric medallions — give instant presence and keep symmetry natural.
Line variation and smart negative space stop crowding. Start small and plan additions so the whole stays balanced.
Balancing fashion-forward style with personal meaning
Mix fine-line frames with a single saturated color accent to stay current. Pair trend with purpose: a phoenix can mark growth, a compass points to direction in life.
Wings and star cues give subtle freedom signals for those testing color or placement. Grooming and clothing choices should frame the work, not fight it.
| Approach | Why it works | Good motifs |
|---|---|---|
| Micro-first | Builds slowly; keeps options open | Arrows, numerals, tiny stars |
| Front statement | High impact; natural symmetry | Crowns, roses, medallions |
| Modular collar | Cohesive over time; readable | Phoenix, compass, wings |
- Plan in modules: minimal start, ladder to a collar.
- Choose line weight to match skin tone and long-term clarity.
- Frame your selection with grooming and wardrobe that highlight beauty and art.
Symbolism Guide: Designs With Power and Purpose
Symbols carry stories; a single icon can anchor an entire personal narrative. We pick imagery that matches intent—whether to claim authority, mark a turning point, or signal faith.
Strength and leadership
Lion, crown, eagle read as authority and presence. These motifs work well as centered pieces or small emblems along the side.
Faith and protection
Cross, compass, 444, 999 combine devotion with guidance. Numerals like 444 and 999 add layered meaning: protection and completion.
Rebirth and resilience
Phoenix, snake, and skull can mark transformation. Pair a phoenix with subtle shading to push rebirth over menace.
Love and wisdom
Rose, feather, dragon, tree, clock link emotion, freedom, and time. Dragons often read as power and wisdom together.
Direction and focus
Arrow and anchor provide clean silhouettes that stay legible on moving skin. We suggest testing stencil scale and spacing on the body.
“Combine motifs into a single medallion or band so separate meanings feel like one unified story.”
- Tip: prefer bolder lines and smart shading so your design ages well.
- Tip: ask an artist to preview stencils under varied light before ink.
Word and Script Neck Tattoos: Statements We Stand By

Script near the jaw can hold a life motto or a simple name with quiet power.
We pick words that carry real meaning—dates, single terms, or short mottos that age with us. Side placement whispers; front placement declares. Map arcs to follow jaw and collar contours so the flow looks intentional.
Type matters. Choose medium-weight script, all-caps serif, or a clean sans to keep lines legible as the skin moves. Avoid ultra-fine fonts; they blur faster on high-motion zones.
Pair a small cross or compass with a word to combine faith and focus in one compact layout. Size so the text reads at conversation distance and test stencils under varied light to check spacing and kerning.
- Draft several phrasings and placements before committing.
- Confirm stencil scale on the body to avoid crowding curves.
- Aftercare: keep moisturized, avoid rubbing collars, and use SPF once healed to preserve crisp edges.
Wings, Stars, and Space-Inspired Ink
Cosmic cues—wings, a lone star, or a tight constellation—let us map meaning across the upper spine. These designs balance freedom and guidance while keeping the area breathable and wearable.
Angel wings symmetry on back and side
We place wing sets along the back or side using the spine as a centerline and the mastoid angle to anchor feathers. Primary feathers get bolder lines; secondary details stay lighter to add depth.
Single star vs. constellation for guidance
A single star reads as a minimal compass point. A small constellation tells a longer story, especially when paired with coordinates or a date.
- Keep negative space open to avoid crowding.
- Test stencils at different head angles for symmetry.
- Moisturize lightly while healing and use SPF once settled.
| Element | Why it works | Aftercare tip |
|---|---|---|
| Wing set | Symmetry and uplift | Moisturize; limit collar friction |
| Single star | Minimal guidance cue | Light SPF after healing |
| Constellation | Personal narrative | Test stencil scale; protect from sun |
Cross and Faith-Driven Pieces That Speak Quietly or Loudly
A simple cross at the side can whisper belief while a centered seal turns devotion into a daily compass.
We compare a small side cross that reads like a private reminder with a front seal that anchors a visible statement of faith and strength.
Numerals such as 444 can signal protection and encouragement. The 999 sequence often marks completion and renewal. Pair these numbers with a compass or subtle lines to layer meaning without crowding the area.
Styles range from clean linework to ornate filigree. We advise slightly thickening thin strokes so the mark stays legible at a distance without losing elegance.
Placement should respect natural curves so the vertical arm follows the throat line. Healing basics matter here: gentle cleansing, minimal friction, and SPF once the area has initial closure.
- Scale test stencils at conversation distance.
- Consult on cultural or denominational details to honor intent.
- Keep the design readable and let belief become a visible reminder of resilience.
Urban-Inspired and Unique Concepts for Everyday Style
City energy reshapes simple marks into wearable statements that move with us. We pull street art into compact layouts that read well on the throat line.
Graffiti-influenced forms use bold tags, layered texture, and gestural lines. These pieces feel raw but stay deliberate when planned to the body’s curves.
Side and back placements reduce friction and let abstract marks flow from ear to shoulder. We map transitions so ink drops into the shoulder for a gallery-like effect.
Keep palettes tight: deep black with one saturated accent keeps urban motifs clean and strong. We fold subtle symbols—crowns, arrows, or wings—into the motion to add personal meaning.
Practical tips: use medium line weights, dotwork, and dry-brush textures to add depth. Reserve negative space so edges stay legible over time.
“Balance raw expression with polished presentation so everyday wear works at events and on the job.”
Geometric and Pattern Work: Precision That Frames the Neck

Geometric layouts give the throat a clean frame that reads like architecture on the body. We anchor design to the centerline—trachea or spine—so symmetry enhances posture and flow.
Symmetry reads strongest on front and back placement. Hex, triangle, and mandala matrices follow jaw and clavicle angles to keep geometry organic rather than rigid.
Symmetry that follows the body’s lines
We test stencils while the client turns, tilts, and nods. That ensures geometry stays stable across movement.
For cover-up work, tessellations and lattice patterns redirect the eye and hide old ink without looking crowded.
High-contrast linework for darker skin tones
Bold outlines and selective interior texture keep motifs crisp over time. Alternate heavy bands with fine internal detail to preserve readability.
We leave negative space between bands so the area breathes and does not look overfilled at close range.
- Center anchoring improves balance and visual power.
- Hex, triangle, and mandala units frame the throat without breaking facial geometry.
- Add a minimal crown or sigil inside the grid to embed leadership themes subtly.
- Choose artists with healed geometric portfolios to guarantee precision.
| Feature | Why it works | Best use |
|---|---|---|
| Centerline anchor | Enhances natural symmetry and posture | Front neck and upper spine pieces |
| Tessellation cover-up | Redirects attention from older marks | Side neck and lower placements |
| Bold outline + fine fill | Long-term clarity on deeper tones | Crowns, sigils, mandalas |
For layout inspiration, we often review healed front-neck medallions and modular collars to plan scale and flow. See a range of front-neck medallion examples here.
Nature Motifs: Waves, Mountains, Trees, and Animal Energy
Nature-themed marks bring movement and meaning to the throat line, turning simple silhouettes into stories. We use waves to show life’s motion, letting crests follow the jaw as flowing side bands that read like rhythm with each turn.
Minimal mountain peaks work best at the back, where symmetrical angles give focus and convey strength and goals. These simple silhouettes stay readable and anchor future additions.
Trees and small forest clusters run vertically so they echo the spine. Pair trunks with birds or feathers to suggest rebirth and quiet renewal. Keep interior detail light so the symbols hold from a few feet away.
We scale animal energy — lion, wolf, eagle — for compact placement and layer them with terrain to deepen meaning. A touch of foggy shading or a moon sliver adds mystery and wisdom without crowding the piece.
- Choose line weight and shading that suit your skin so silhouettes stay crisp.
- Test compositions seated and standing to confirm motion works with posture.
- Preserve negative space so each design breathes and the area avoids overcrowding.
Color vs. Black and Gray on Dark Skin: What Really Pops

Color choices and strong linework change how a piece reads under sunlight and in shadow. On deeper skin tones, high-contrast blacks and saturated reds, blues, and golds keep edges crisp and the overall design legible.
We often prefer a rich black structure as the anchor, then add selective color pops so the ink stays clear from a distance.
Highlights and negative space define detail better than soft mid-tone blends. That means leaving small gaps and bright strokes to separate layers and prevent muddiness.
- Placement: favor the back-of-neck or side areas to reduce direct sun and abrasion.
- Palette: choose saturated reds, deep blues, and warm gold accents paired with bold black outlines.
- Durability: plan color away from high-friction spots and use daily SPF once healed.
Waves of color can band the side without overpowering the silhouette when we use thin color ribbons over a black base. Test swatches or colored markers on stencil day so you can see how pigments read in daylight and under indoor lighting.
Tip: work with an artist who knows pigment load and needle groupings for darker skin so your design keeps its beauty over time. For compact inspiration and small-scale ideas, see our guide to meaningful small pieces.
Pain, Healing, and Aftercare on the Neck
Sensitivity rises around the throat, so we plan sessions with realistic pain expectations. The front area is often the most reactive because skin is thin and nerves sit close to bone. We schedule breaks, hydrate well, and avoid blood thinners so the session stays manageable.
How we prep and manage pain
Before the day: rest, eat, and wear loose collars. We ask clients to skip alcohol and NSAIDs pre-session. Small sips of water and planned breaks keep circulation steady during work.
Sun, movement, and fading risks
Constant motion and direct sun speed fading. Once healed, daily SPF and soft fabrics reduce abrasion and preserve contrast. Avoid tight collars until the area fully settles.
Timeline, moisturizers, and practical tips
Outer healing takes 2–3 weeks; inner layers can take several months to fully settle. We recommend fragrance-free lotion applied in thin layers and light cleansing twice a day while skin repairs.
- Night tips: sleep on a clean pillowcase and favor positions that avoid pressure on the area.
- Lotion pacing: thin, frequent layers prevent clogging while keeping skin supple.
- When to call your artist: persistent heat, spreading redness, or discharge require prompt review.
| Stage | What to expect | Action |
|---|---|---|
| Immediate (day 0–3) | Redness, swelling, scabbing | Gentle cleansing; thin moisturizer; avoid collars |
| Outer heal (2–3 weeks) | Peeling, itchiness, color softening | Moisturize; hands-off; light SPF once closed |
| Full settle (3–6 months) | Depth and color stabilize | Routine SPF; touch-ups if needed |
Cover-Up and Refresh Strategies for the Neck
When old ink needs a second life, a smart overlay can turn flaws into strength.
We start by auditing the existing piece—line weight, placement, and saturation—so the new design truly conceals, not just competes. That initial review sets realistic goals and tells us whether partial laser fading or multiple sessions are needed.
Side-neck geometric overlays and nature motifs
Geometric patterns create fresh focal points and visually confuse remaining lines. They work especially well along the side neck behind the ear, where flow and angles help mask old edges.
Nature motifs—feathers, leaves, and waves—add organic texture that hides dated strokes while keeping movement and balance. We often pair a rich black anchor with one accent color to maintain power and clarity.
- Set realistic expectations: some cases need a fade or two before full cover.
- Plan aftercare: sunscreen once healed and scheduled touch-ups lock in coverage.
- Choose an artist with healed cover-up portfolios you can review.
| Step | Why it matters | Common approach |
|---|---|---|
| Audit existing ink | Defines conceal strategy | Assess lines, saturation, placement |
| Design overlay | Redirects focus | Geometric grids or flowing nature motifs |
| Palette & sessions | Ensures coverage | Black anchor + single accent; multi-session plan |
Finding the Right Artist in the United States
Choosing the right artist makes the difference between a confident long-term piece and one that needs constant fixes. In the U.S. we can filter large rosters by studio and style, then verify healed work and neck-specific portfolios before booking.
Style specialization matters: seek fine line artists for script and micro details, geometric specialists for precise grids, blackwork pros for bold contrast, and color realism studios for portraits or florals.
Review healed work and neck-focused portfolios
We require healed examples, not only fresh photos. Healed images show how line weight, shading, and pigment hold up on a mobile body zone over time.
Practical checklist before booking
- Confirm portfolio depth in the target placement so anatomy and movement are respected.
- Check studio hygiene, aftercare guidance, and protection advice for long-term tone retention.
- Compare booking windows and time estimates—neck compositions often need extra stenciling and session time.
- Read reviews about how artists work with darker skin tones to ensure pigment choices and technique match our needs.
- Verify communication style and revision policy, then lock a deposit only after timelines and the design process are clear.
“Filter by specialization, confirm healed neck work, and prioritize artists who explain protection, timing, and care.”
Tip: platforms list U.S. studios like Uplift Tattoo NYC, White Rabbit Tattoo Studio, and Mirai Tattoo Gallery. Use those as starting points, then narrow by healed neck portfolios and clear scheduling policies.
Quick-Start Inspiration: Small, Medium, and Full-Neck Ideas
Start with a compact idea and let future sessions shape the full composition.
Small options are perfect everyday starters. A single star, minimal arrow, or the numerals 444 on the side neck read clean and are easy to expand later.
Medium builds bridge small and bold. Think a crown seal tucked under the chin, a rose that wraps to the jawline, or clipped wings at the mastoid to lift the view. These ideas carry strength while staying wearable with collars and chains.
Full-neck plans need careful mapping. Use a geometric frame with a center icon to keep front symmetry and enough negative space so the design breathes. Balance is key when scaling across jaw, throat, and clavicle.
- Opt for strength-forward icons like a lion or anchor in medium layouts.
- Add selective color accents — gold on a crown tip or muted blue on a star — to keep beauty without blur.
- Use small space nods and constellations behind the ear as future expansion points.
- Preview with temporary transfers to test placement, angle, and size before booking.
“Begin small, test with a transfer, then build in planned stages so the whole reads strong and deliberate.”
Conclusion
When design, care, and context align, a throat piece becomes a lasting part of how we show up. A well-planned neck tattoo blends personal meaning with confident aesthetics that carry into daily life. We weigh visibility, workplace realities, and maintenance so the look stays powerful and clear.
Choose words and symbols that feel timeless, not merely trendy. Men strike the best balance when strong design meets sustainable aftercare. Shortlist tattoo ideas, consult specialists, and review healed work before you commit.
Final note, with the right artist and plan our neck tattoos can become enduring statements of power and purpose.