Ready to take your nail game to the next level? Trendy nail art is all about ombre nails, and pink and grey is a top pick. But why do people love this combo so much?
The pink and grey ombre nails trend is more than just pretty. It’s a way to show off your style. With nail trends 2021 all about ombre, now’s the perfect time to give it a try.
This article will show you how to get stunning pink and grey ombre nails at home or in a salon. You’ll find out the best methods, products, and tips to make your nails pop.
Key Takeaways
- Learn the best techniques for creating ombre nail effects.
- Discover the top products for achieving a flawless ombre finish.
- Understand how to choose the right shades of pink and grey for your skin tone.
- Get tips on maintaining your ombre nails for a longer-lasting finish.
- Explore the latest nail trends and how to incorporate them into your style.
What Are Ombre Nails?
Ombre nails are a nail art style where colors blend from dark to light. This creates a stunning effect. It’s become popular for its unique and stylish look.
Definition and Concept of Ombre Nails
Ombre nails start with darker colors at the cuticle and get lighter towards the tip. This gradient nail art lets you be creative. You can go for subtle or bold looks.
What makes ombre nails special is how customizable they are. You can pick colors that match your mood or style. Whether it’s a classic combo or something bold, ombre nails let you express yourself.
The Popularity of Ombre Nail Art
Ombre nail art is loved for its beauty and endless options. Social media has made nail art more popular. Now, people can try DIY ombre nails at home.
Ombre nails work for any occasion, from everyday to formal events. Their versatility and creative freedom make them a favorite in nail art.
Why Choose Pink and Grey Ombre Nails?
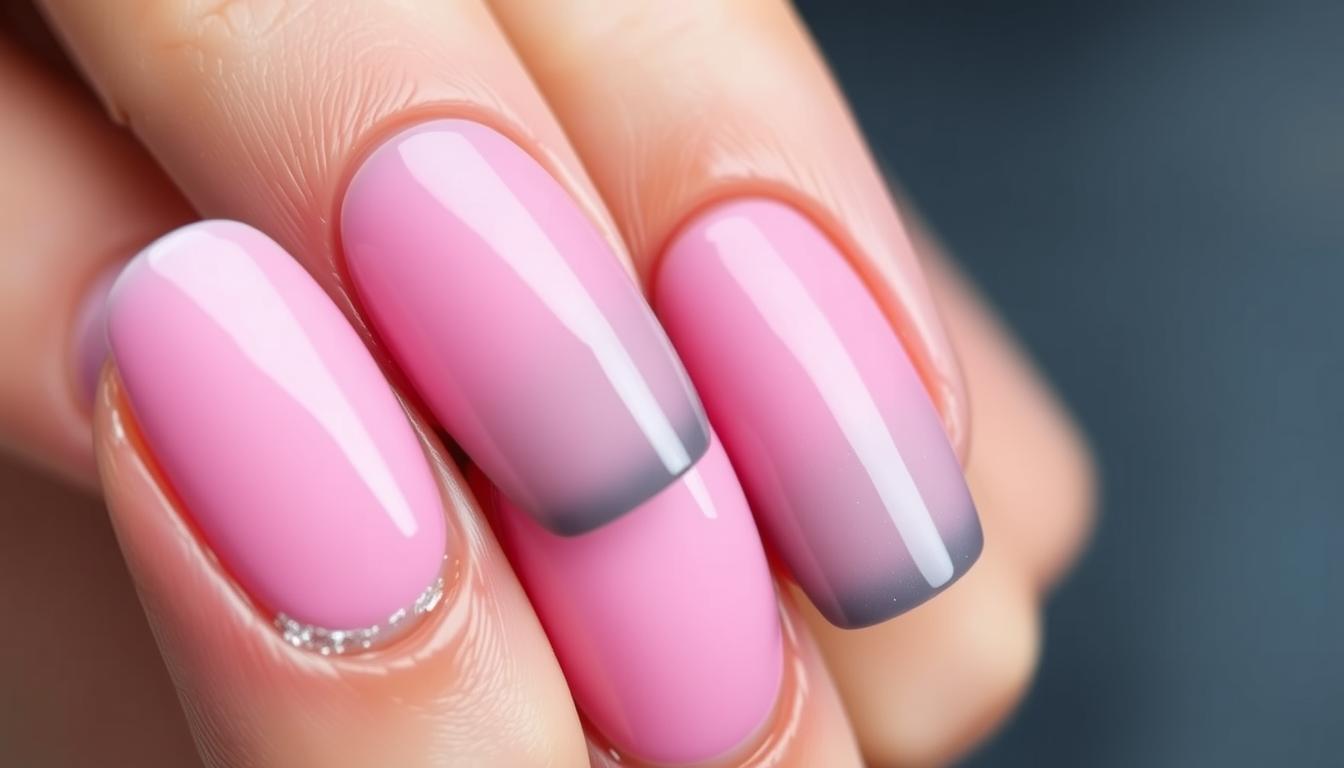
Pink and grey ombre nails are a top pick for those who want a sophisticated look. This style is loved for its mix of elegance and modern flair.
Aesthetic Appeal
The beauty of pink and grey ombre nails is their soft gradient. This creates a beautiful transition between colors. Pastel nail colors like soft pink and grey are very popular for their romantic feel.
This color mix looks great on many skin tones. You can choose a delicate, natural look or something bolder. The pink and grey ombré manicure can be adjusted to fit your style perfectly.
Versatility for Different Occasions
Pink and grey ombre nails are great for any time. They work well for everyday wear and for special events. The subtle color shift is perfect for work, while the design is stylish for parties.
- Perfect for daily wear with a subtle, natural look
- Ideal for formal events with the right accessories
- Can be customized with different shades of pink and grey
Choosing pink and grey ombre nails means you get a stylish, versatile design. It suits your taste and fits various occasions.
Essential Tools for Creating Ombre Nails
To get a great ombre nail design, you need the right tools and materials. You’ll need a few key items to make your nails look stunning.
Nail Polish Recommendations
Choosing the right nail polish is key for ombre nails. Look for polishes that are neither too thick nor too thin. For a pink and grey ombre, use top brands like OPI or Essie.
Some great shades include soft pink, blush, and different grey tones.
| Color | Brand | Shade Name |
|---|---|---|
| Pink | OPI | Malibu Beach |
| Grey | Essie | Wicked |
| Soft Pink | Sally Hansen | Insta-Dri Pinkalicious |
Nail Tools Needed for Application
You’ll also need special tools for a smooth ombre effect. A makeup sponge is vital for blending colors. A nail art brush helps clean up around your cuticles and nail bed.
You’ll also need a base coat to protect your nails and a top coat to seal your design. Don’t forget a nail cleanser to remove oils or lotions before applying polish.
Step-by-Step Guide to Creating Pink and Grey Ombre Nails
To get gorgeous pink and grey ombre nails, follow this easy guide. It covers preparation, application, and blending. Making ombre nails is fun and creative. With the right steps, you can get pro-looking nails at home.
Preparing Your Nails
Start by getting your nails ready. Remove old polish and push back your cuticles. Use a nail file to shape your nails. Clean them with a lint-free wipe and nail cleanser to remove oils and residue.
Applying Base Coat
Apply a thin layer of clear base coat. It protects your nails and helps polish stick better. Let it dry completely before moving on. This step is key for lasting, flawless ombre nails.
Blending Techniques for Ombre Effect
To get the ombre look, blend pink and grey polish on a makeup sponge. Put pink on one edge and grey on the other, overlapping in the middle. Dab the sponge on your nail, starting at the cuticle and moving to the tip. Keep dabbing until you get the color you want.
For a soft ombre, use a light touch and build up the color slowly. For a bold look, press harder and dab more times.
| Nail Polish Color | Application Technique | Effect |
|---|---|---|
| Pink | Apply to cuticle area | Creates a soft, gradient start |
| Grey | Apply to tip of nail | Gradually blends to tip |
| Pink and Grey Blend | Dab onto nail with sponge | Creates ombre effect |
By following these steps and practicing blending, you can make beautiful pink and grey ombre nails. They’re perfect for any event.
Tips for a Flawless Ombre Finish
Getting a perfect ombre finish needs precision and the right techniques. To make stunning ombre nail designs, focus on details and follow important guidelines.
Choosing the Right Color Shades
Picking the right shades for your ombre nails is key. For a pink and grey nail art look, choose colors that go well together. Think about the event and your style when picking shades.
Nail art experts say, “The secret to a great ombre is blending colors that are close, but not too close, and not too far apart.”
“A good rule of thumb is to choose colors that are adjacent to each other on the color wheel.”
Mastering the Gradient Technique
Practicing is key to a smooth gradient. Start with a base coat to protect your nails. Then, use a makeup sponge to apply polish, building up the color gradually.
For a trendy nail art look, try different blending methods. The secret to a flawless ombre is blending colors smoothly and avoiding harsh lines.
Maintaining Your Ombre Nails

After getting your ombre nails, it’s key to follow some aftercare tips. These tips help keep your nails looking great, whether you chose pink and grey or another combo. If you did them yourself, these tips are just as important.
Recommended Aftercare Practices
To keep your ombre nails looking good, avoid harsh chemicals. Wear gloves when washing dishes or using cleaning products to protect your nails. Also, be gentle when washing your hands and avoid using your nails as tools.
Moisturizing your cuticles and nail beds is vital. Use a cuticle oil or nail cream regularly to keep them hydrated. This prevents dryness and brittleness.
How to Touch Up Your Ombre Nails
Touching up your ombre nails at home is easy. First, clean your nails with a nail polish remover. Then, apply a base coat to protect them. If the ombre effect has faded, reapply the polish, starting with the lightest shade.
If you’re not sure about touching up your ombre nails, see a professional nail technician. They can help with the best products and techniques for your nails.
Common Mistakes to Avoid
Getting a perfect ombre finish needs careful attention and avoiding common errors. When doing ombre nails, it’s easy to make mistakes that ruin the look. We’ll talk about some common mistakes to steer clear of.
Overlapping Colors
One big mistake in ombre nails is overlapping colors. This can make the finish look muddy or uneven. To avoid this, blend colors gently and clean your brush between uses. A nail artist expert advises, “A soft gradient technique helps avoid color overlap and smooths out shade transitions.”
To reduce color overlap, use a gradient nail guide or makeup sponge. These tools help blend colors for a soft ombre effect.
Not Allowing Proper Drying Time
Not waiting long enough for polish to dry is another mistake. This can make the polish smudge or look uneven. Always let each coat dry fully before adding the next. Wait at least 30 seconds to a minute, depending on the polish.
“Patience is key in ombre nail art,” a seasoned nail technician notes. “Hurry can lead to a bad finish. Take your time for beautiful, lasting results.”
Inspiring Designs and Variations
Get creative with ombre nail designs that feature glitter and nail art. Pink and grey ombre nails are perfect for showing off your style. You can go for a simple look or make a bold statement.
Ombre with Glitter Accents
Glitter accents can make your ombre nails shine. Pick glitter polish in various colors and densities for a unique look. For a classy vibe, pair pink and grey with silver glitter. For something bolder, use chunky glitter that matches your ombre.
Incorporating Nail Art and Designs
Nail art can enhance your ombre nails with detailed designs. You can choose from flowers to geometric shapes. Use guides or stickers for clean lines or go freehand for a personal touch.
Here are some nail art ideas for ombre nails:
- Contrasting color stripes or dots
- Floral or motif designs
- Geometric or abstract patterns
Looking for inspiration? Here are some trending designs:
| Design | Description | Best For |
|---|---|---|
| Ombre with Stripes | Alternating pink and grey stripes | Modern, edgy look |
| Glitter Accent Nail | A single nail with glitter | Adding glamour |
| Floral Ombre | Floral pattern on ombre nails | Spring and summer themes |
By adding glitter and nail art to your ombre design, you can make a unique and stunning look. It will show off your personality and style.
Nail Salons That Excel in Ombre Techniques
Looking for stunning pink and grey ombre nails? You’re in luck. Many top salons in major US cities are experts in ombre techniques. They have skilled nail technicians and use high-quality products.
Top Salons in Major US Cities
In New York City, Nails by Jen and The Nail Studio are known for their ombre nail art. Los Angeles has Nail Lounge and Ellie Nail Art as favorites among nail lovers.
These salons have experienced nail technicians. They keep up with the latest trends, including ombre nail designs. They use top-notch products to make sure your ombre nails look amazing and last.
Finding a Skilled Nail Technician
Want to find a skilled nail technician for your ombre nails? Here are some tips:
- Check online reviews and ratings to see what other clients have to say about their experiences.
- Look at the salon’s portfolio to get an idea of their work quality and style.
- Ask for referrals from friends or family members who have had similar nail work done.
By following these steps, you can find a skilled nail technician. They can help you get the perfect pink and grey ombre nails. As a nail expert says, “The key to great ombre nails is blending the colors seamlessly. With the right technician, you can achieve a flawless look.”
“Ombre nails are all about the gradient effect. When done correctly, it adds a touch of elegance to any nail design.” –
DIY Ombre Nail Kits to Consider
DIY ombre nail kits have changed how we do nail art at home. They let you get a pro-looking ombre manicure without going to the salon.
Popular Brands for At-Home Use
Many brands make top-notch DIY ombre nail kits for home use. Some favorites include:
- Sally Hansen: Famous for their wide range of nail polish colors and simple application.
- Revlon: Has ombre nail kits with various color mixes and finishes.
- Essie: Offers quality nail polish and tools for making salon-quality ombre nails at home.
Advantages of Using a DIY Kit
DIY ombre nail kits come with big benefits, like:
- Cost-effectiveness: They save money by avoiding salon trips.
- Convenience: You can do nail art anytime, from home.
- Customization: Let you try out different colors and designs.
With the right DIY ombre nail kit, you can get a stunning pink and grey ombré manicure. It’s just as good as salon nail art.
Seasonal Trends with Pink and Grey Ombre Nails
Whether it’s summer, spring, autumn, or winter, pink and grey ombre nails can match your seasonal style. This makes ombre nails very popular.
As seasons change, so do nail art trends. For pink and grey ombre nails, changing the color palette is key to staying trendy.
Seasonal Color Palettes
In spring, soft pink and grey shades are perfect for a fresh look. Summer calls for brighter, bolder colors. Autumn is great for deeper, richer tones. Winter is the time for metallic shades.
For example, in spring, a pale pink to soft grey gradient is lovely. Summer’s hot pink to dark grey ombre is striking. Autumn and winter offer chances to play with warm, cool tones and metallic accents.
Celebrating Holidays with Ombre Designs
Ombre nails are fun for holidays all year. For Valentine’s Day, a pink and red ombre is romantic. Halloween calls for a grey to black ombre with nail art accents. Christmas and New Year’s Eve are perfect for glitter or metallic shades.
By adding seasonal themes and colors to your trendy nail art, you stay fresh with the latest nail trends 2021. Whether at a salon or DIY, the options are endless.
Real User Experiences and Testimonials

Many nail fans have shared their thoughts on pink and grey ombre nails. They love how trendy and versatile this nail art is. Most users say it looks great and is easy to do.
Reviews from Nail Enthuisiasts
Those who’ve tried pink and grey ombre nails can’t stop raving. Emily, a DIY nail art lover, says it’s easy to get a pro look at home. Many also mention how long the polish lasts without chipping.
Common praises include:
- The unique and personalized look of ombre nails
- The ease of creating ombre nails at home with the right tools
- The long-lasting results when done correctly
Social Media Feedback on Ombre Nails
Social media is full of people showing off their ombre nails. They use hashtags like #ombreNails and #nailart. Instagram is a hub for DIY ombre nail art, with users sharing tips and photos.
A look at social media feedback reveals:
- Users appreciate the creativity and self-expression that ombre nails offer
- Many users share their before-and-after photos, showing off the dramatic change
- The community is supportive, with users giving advice and encouragement
In summary, pink and grey ombre nails are a hit among users. They’re stylish and fit for any event. Whether you’re new to nail art or a pro, the community’s feedback is full of inspiration and tips.
Conclusion: Your Next Step to Gorgeous Ombre Nails
Now you know how to make stunning pink and grey ombre nails. It’s time to try out trendy nail art. Play with colors and designs to find your unique style.
Exploring New Ombre Nail Designs
Try new ombre nail designs in your beauty routine. Mix different shades of pink and grey for a unique look. Add glitter or nail art for extra elegance.
Share Your Creations
We want to see your ombre nail designs! Post them on social media. Join a community of nail lovers who love trendy nail art. Your next step to gorgeous ombre nails is just a brushstroke away.