Ever wondered why your fingertips feel parched and brittle after salon visits? Many beauty enthusiasts face this dilemma when maintaining their manicures. Traditional removal methods often rely on potent solvents that strip moisture and weaken your natural base over time.
Skin irritation and lingering chemical odors aren’t just inconveniences – they’re warning signs. For those with sensitive skin or fragrance sensitivities, standard products can turn a routine beauty step into an uncomfortable ordeal. Even salon professionals now recognize the demand for kinder alternatives.
The good news? Modern techniques let you maintain healthy cuticles while keeping your style fresh. From nourishing oils to innovative soaking solutions, effective options exist beyond conventional approaches. Let’s explore why gentler strategies work and how they fit into today’s self-care routines.
Key Takeaways
- Harsh solvents can dehydrate skin and weaken natural nail beds
- Alternative methods prevent allergic reactions and chemical odors
- DIY approaches often preserve nail strength better than traditional removal
- New techniques align with growing at-home beauty trends
- Proper removal maintains manicure longevity between salon visits
Introduction to Acrylic Nail Removal at Home

Your gorgeous manicure has served its purpose, but now it’s time for a change. Whether extensions have grown out, chipped, or you’re craving a new style, knowing when to refresh your look keeps your hands looking their best. Proper maintenance isn’t just about aesthetics – it’s about preserving your natural base beneath.
Understanding the Purpose of Refreshment
Extensions need attention when gaps appear near your cuticles or edges start lifting. These signs indicate it’s time for action. Waiting too long risks moisture getting trapped, which can lead to bacterial growth. Immediate care prevents lifting from worsening and maintains your nail bed’s integrity.
Why Consider Acetone-Free Methods?
Traditional solvents work quickly but often leave skin dry and irritated. Gentler approaches have gained popularity for good reason: they maintain moisture levels while breaking down enhancements. Many DIY enthusiasts find these techniques less harsh on their cuticles and surrounding skin.
| Method | Skin Impact | Time Required |
|---|---|---|
| Acetone-Based | May cause dryness | 15-20 minutes |
| Acetone-Free | Preserves moisture | 25-35 minutes |
Home care lets you control the pace of your beauty routine. No rushed appointments or unexpected fees – just cost-saving benefits and the satisfaction of mastering a new skill. With the right tools, you’ll maintain healthy results between salon visits.
Understanding Acrylic Nails and Their Effects
Choosing the right artificial enhancements can feel like navigating a glittery maze. Each option offers unique benefits and challenges for your hands’ appearance and health. Let’s break down popular styles and their interactions with your biological canvas.
Different Types of False Nails
Traditional acrylics combine liquid monomer and polymer powder, creating durable extensions ideal for bold designs. They harden through air drying, making them budget-friendly for frequent style changes.
Gel varieties use resin cured under UV/LED lights, offering flexible strength with a mirror-like shine. These blend seamlessly with natural curves, reducing visible seams.
| Type | Curing Method | Average Wear Time |
|---|---|---|
| Acrylic | Air-dried | 3-4 weeks |
| Gel | UV/LED light | 2-3 weeks |
| Press-On | Adhesive backing | 1-7 days |
Impact on Natural Nails and Cuticles
Long-term wear of acrylics may thin your nail plate if improperly removed. Gel polish’s filing process can weaken surfaces, while press-ons cause minimal damage when peeled carefully.
Nail wraps made from silk or linen protect beds but require glue that might irritate sensitive cuticles. Shellac acts as armor but demands cautious removal to avoid peeling layers.
Pro tip: Rotate enhancement types to let your biological nails recover between applications. Hydrate cuticles daily to counteract drying effects from adhesives or powders.
How to remove acrylic nails without acetone

Modern beauty routines demand solutions that protect your natural nail health. Gentle approaches now let you switch up your look while keeping cuticles intact. Let’s explore techniques endorsed by top manicurists and dermatologists.
Overview of Acetone-Free Techniques
Alcohol-based removers break down adhesive bonds without stripping moisture. Beauty expert Lisa Price notes:
“These formulas dissolve enhancements gradually, giving you control over the process.”
Warm water mixed with mild soap softens extensions naturally. Soak for 10 minutes, then gently lift edges with an orange stick. This method works best for press-ons or weak adhesive bonds.
Nutrient-rich oils offer dual benefits. Jojoba penetrates deep to loosen glue, while almond oil prevents peeling. Massage blends into cuticles daily for three days before attempting removal.
Comparing Methods from Various Experts
| Approach | Effectiveness | Time Needed | Skin Safety |
|---|---|---|---|
| Alcohol Remover | High | 25-30 mins | Excellent |
| Warm Soak | Moderate | 15-20 mins | Superior |
| Oil Treatment | Gradual | 3 days | Best |
Filing should only remove top layers – never dig into your natural base. Combine methods for stubborn cases: soak first, then use oil-soaked cotton pads. Always follow with moisturizer to replenish hydration.
Alternative Methods for Removing Acrylic Nails

Switching up your manicure shouldn’t leave your hands feeling like sandpaper. Gentle alternatives let you refresh your style while keeping your natural base strong. Let’s explore two approaches that prioritize your skin’s health and nail integrity.
Non-Acetone Solutions & Soapy Soaks
Alcohol-based removers work by dissolving glue bonds gradually. Beauty blogger Jamie Waters suggests:
“These formulas give you control – you’ll see edges lifting naturally within 25 minutes.”
Pair them with warm water (110°F max) and mild dish soap for better results. Soak for 10 minutes to soften enhancements without over-drying.
| Method | Best For | Prep Time |
|---|---|---|
| Alcohol Remover | Stubborn glue | 25-30 mins |
| Soap Soak | Press-ons | 15 mins |
Nourishing Oils & Strategic Filing
Jojoba and almond oils penetrate glue layers while hydrating cuticles. Apply 3 drops daily before removal attempts. For thick polish layers, use a 180-grit file in one direction only. Avoid sawing motions – they create weak spots.
- Test water temperature on your wrist first
- Wrap cotton pads around nails during oil treatments
- File only the top surface of enhancements
Watch for white spots while filing – they signal you’re nearing your natural nail bed. Stop immediately and switch to soaking if this occurs. Your skin will thank you for these precautions!
Preparations and Essential Tools for Safe Removal

Transforming your bathroom into a mini-salon starts with smart preparation. Having the right equipment makes all the difference between a smooth experience and a frustrating one. Let’s explore how to set up your space for success.
Gathering Tools and Products
Your toolkit should include six essentials: acetone-free remover, tip cutters, a wide manicure bowl, 80/80 grit files, and a stainless steel cuticle pusher. These products work together to protect your natural base while breaking down enhancements gently.
| Tool | Purpose | Pro Tip |
|---|---|---|
| 80/80 Grit File | Removes bulk material | File in one direction only |
| Cuticle Pusher | Lifts edges safely | Use rounded end to avoid tears |
| Manicure Bowl | Holds warm soaks | Add lavender oil for relaxation |
Pre-Removal Nail and Cuticle Care
Start by trimming extensions to match your natural nail length. This reduces filing time and prevents accidental tears. Hydrate your cuticles with jojoba oil for 10 minutes – plump skin resists damage better during the process.
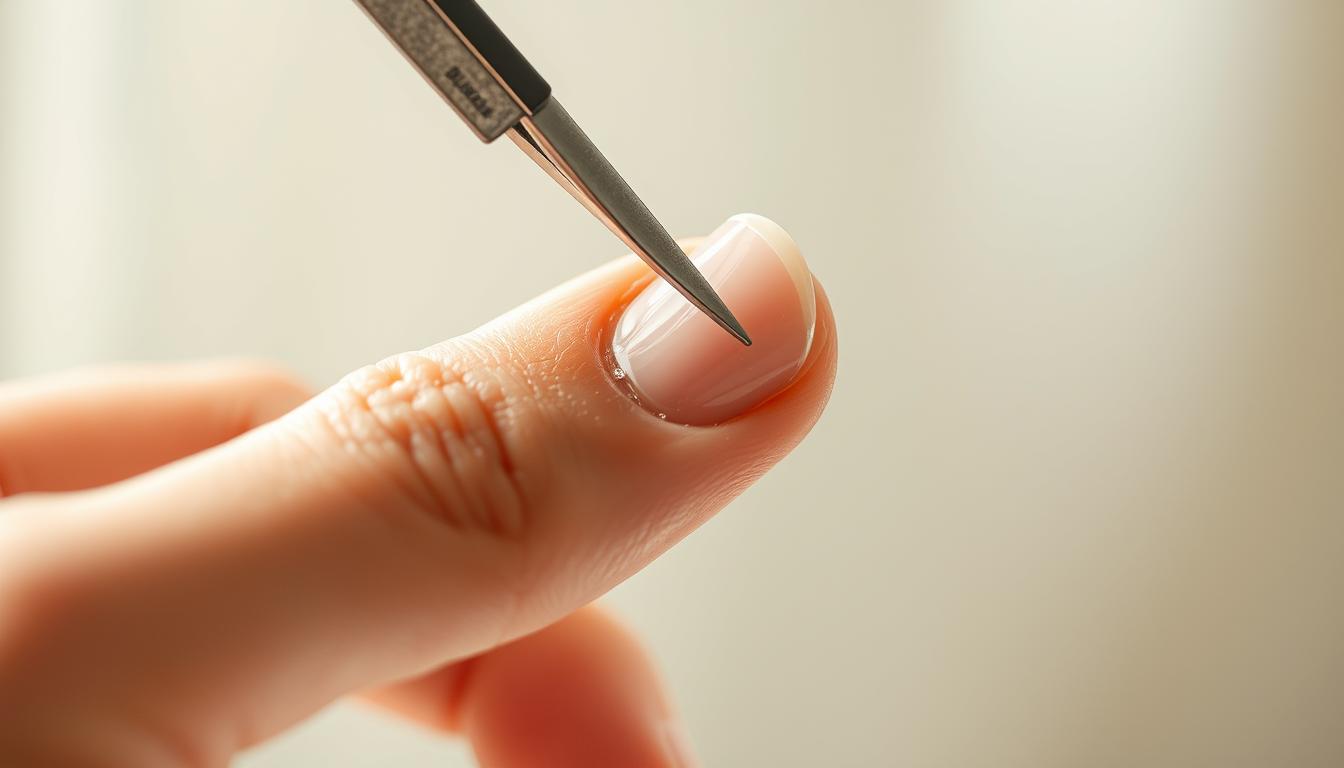
Professional-grade manicure tools like Elegant Touch’s slanted tweezers give precision control. Their angled design lets you lift edges without scraping sensitive areas. Pair these with their 80/80 grit files for efficient material removal.
Set up your workspace near natural light with all tools within reach. Play calming music and keep a towel nearby for quick cleanups. Remember: patience preserves your nail health better than rushing ever could!
Step-by-Step Process for At-Home Acrylic Removal

Ready to refresh your manicure without the salon trip? This method preserves your natural base while letting you switch styles effortlessly. Follow these expert-approved steps for smooth transitions between looks.
Effective Soaking and Softening Techniques
Start by trimming extensions with stainless steel cutters – shorter lengths mean less filing later. Soak cotton pads in alcohol-based solution (non-acetone), then wrap each finger securely. Wait 15 minutes – check edges every 5 minutes for lifting signs.
- Use warm water (not hot) to boost solution effectiveness
- Add 1 tsp olive oil to your soak for extra hydration
- Never force lifting – patience prevents damage
Safe Filing and Tweezing Procedures
When edges start separating, gently file surfaces with 180-grit tools. Pro tip: Angle files downward to avoid natural layers. For stubborn spots, reapply solution-soaked pads for 7 minutes. Licensed esthetician Mara Lee advises:
“Work in sections – complete one finger before moving to the next. This prevents overexposure to solutions.”
Combining Multiple Techniques for Best Results
Alternate between soaking and light filing for optimal results. Track your progress with this simple guide:
| Step | Time Needed | Tool |
|---|---|---|
| Initial Soak | 15 mins | Cotton wraps |
| Surface Filing | 5 mins | 180-grit file |
| Final Cleanup | 3 mins | Cuticle pusher |
Finish with a moisturizing scrub to eliminate residue. Your hands deserve this pampering after their transformation!
Nail Aftercare and Post-Removal Tips
Your freshly revealed natural nails deserve thoughtful attention. Proper maintenance keeps them strong while preparing for future styles – whether you choose short chic or dramatic solar nails.
Hydration and Moisturizing Your Nails
Buff gently with a glass file to smooth edges without causing micro-tears. Jojoba oil works wonders – massage 3 drops into each cuticle morning and night. For extra protection, apply a keratin-rich cream after handwashing.
Wear gloves during chores to shield your hands from harsh cleaners. This simple habit prevents brittleness and maintains your manicure’s polished look longer.
Long-Term Nail Health and Follow-Up Treatments
Schedule weekly 10-minute soaks with warm olive oil to replenish moisture. Avoid picking or biting – damaged layers take months to regrow. If you notice peeling, use a strengthening base coat for 7 days.
Rotate between breathable polish and bare nails every 2-3 weeks. Track progress with monthly photos – healthy growth should appear pink and smooth. Your care routine today builds the foundation for stunning styles tomorrow!