Body art on the knee has surged in popularity as a daring way to showcase personality. Unlike traditional placements, this area offers a 360-degree canvas for designs that move with you. Whether you prefer geometric patterns or symbolic imagery, the joint’s natural curves inspire creativity while demanding technical skill from artists.
Choosing this spot isn’t just about aesthetics—it’s a commitment. The process involves unique challenges, from heightened sensitivity during sessions to longer healing times. But for many, the symbolism of resilience and forward motion makes it worth the effort. As one tattoo enthusiast put it, “Every step becomes a reminder of what you’ve overcome.”
This guide dives into everything you need to know. We’ll explore trending styles, pain management tips, and how to collaborate with artists for optimal results. You’ll also discover how to adapt designs to accommodate the body’s constant motion, ensuring your ink ages gracefully.
Key Takeaways
- Knee placements allow dynamic, eye-catching designs that emphasize movement and personal growth
- Proper aftercare is crucial due to the area’s frequent bending and friction
- Pain levels vary but generally rank higher than other body locations
- Simpler designs often heal better than highly detailed artwork
- Experienced artists familiar with joint tattoos yield better long-term results
Overview of Knee Tattoos

Choosing this joint for body art offers a bold statement that combines creativity with anatomical awareness. The area’s rounded shape and constant motion demand designs that adapt to bending and stretching. Unlike flatter body parts, the kneecap’s thin skin layer over bone requires precise technique to avoid ink spread over time.
Artists often recommend simpler patterns here due to limited cushioning tissue. “Geometric shapes or symbolic icons work best,” notes a Chicago-based tattooist. Surrounding zones like the sides or upper leg allow more detail, blending seamlessly with larger leg pieces.
Flexibility affects both application and healing. Every squat or step stretches the skin, challenging long-term clarity. Proper aftercare becomes crucial—think loose clothing and minimal bending during recovery. Many enthusiasts embrace these demands as part of their ink’s story.
Popularity stems from visibility and symbolic weight. Visible in shorts or skirts, these placements showcase commitment to self-expression. They’ve become favorites among athletes and creatives alike, merging form with function in unexpected ways.
Design Inspirations and Unique Styles

Your joint becomes a living canvas for artistic expression. From sharp angles to flowing colors, this area lets you showcase designs that evolve with movement. Let’s explore styles that turn everyday motion into wearable art.
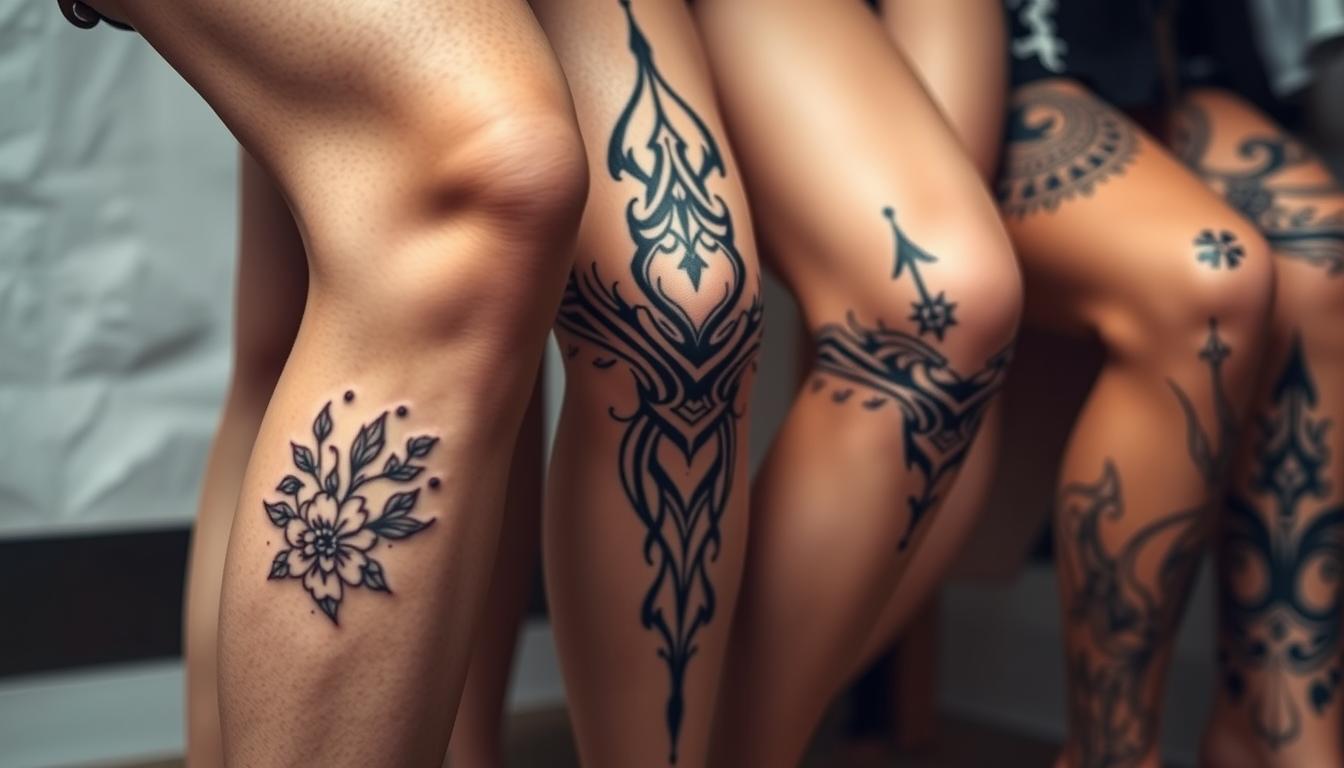
Shapes, Nature, and Cultural Motifs
Geometric patterns thrive here. Triangles and hexagons mirror the joint’s angles, while mandalas create hypnotic symmetry. “These shapes guide the eye around the curve,” explains a New York artist. Floral concepts wrap like botanical bracelets—roses or cherry blossoms softening the area’s edges.
Tribal designs pack visual punch. Bold black lines from Polynesian or Maori traditions emphasize natural contours. They’re ideal for creating dynamic silhouettes when bending or stretching.
Creatures, Drama, and Artistic Flair
Animal themes roar with personality. A wolf’s gaze or eagle’s wingspan adds symbolic power. Gothic lovers might choose skulls with intricate shading—a striking contrast against pale skin.
Watercolor techniques blend hues like liquid art. Imagine galaxies swirling across your joint or sunset shades melting into abstract shapes. These painterly styles hide aging better than fine lines.
Whether you crave minimalist symbols or full-color scenes, your ink becomes part of your body’s language. Just remember: simpler designs often withstand time better on high-movement zones.
Factors to Consider Before Getting Knee Tattoos

Deciding to ink this dynamic area involves more than choosing a design. The joint’s unique anatomy demands careful planning to ensure your body art ages well. Let’s break down key factors that’ll help you make an informed decision.
Pain tolerance tops the list. With thin skin and minimal cushioning, many describe the sensation as intense—like “a hot knife scraping bone,” according to one artist. If you’ve handled other bony areas before, that experience might help gauge your readiness.
Healing presents another hurdle. Constant bending disrupts scabbing, increasing infection risks. You’ll need an aftercare routine that accommodates movement—think loose pants and strategic rest days. Skipping gym sessions or yoga classes temporarily could save your ink’s clarity.
Visibility matters too. While summer shorts showcase your art, office dress codes might clash. Consider whether your workplace views visible body art as unprofessional. A discreet placement below the kneecap offers flexibility for formal settings.
Maintenance isn’t optional here. Friction from jeans and sun exposure accelerates fading. Regular moisturizing and touch-ups every few years keep designs crisp. Active lifestyles add wear—runners and cyclists often notice quicker pigment loss.
Timing your session wisely minimizes stress. Schedule it during a low-activity period where you can elevate your leg frequently. Remember: proper healing takes 2-4 weeks of mindful care. Are you ready to prioritize that commitment?
Pain, Healing, and Aftercare Considerations

Getting inked on this joint requires mental and physical preparation. The area’s unique anatomy amplifies both the sensation during sessions and the attention needed during recovery. Let’s break down how to navigate this process smoothly.
What to Expect During Your Tattoo Session
Expect a mix of sharp stinging and deep vibrations as the needle interacts with tight skin over bone. Many describe it like a swarm of bees targeting one spot repeatedly. The lack of muscle padding means you’ll feel every pass more intensely than on fleshier areas.
Breathing techniques help manage discomfort. Artists often suggest scheduling shorter sessions—2-3 hours max—to avoid overwhelming your pain tolerance. “Hydrate well and eat a protein-rich meal beforehand,” advises a Seattle-based tattooist. This stabilizes blood sugar, reducing dizziness risks.
Effective Aftercare and Healing Tips
Your healing process unfolds in two acts. First, the surface repairs over 7-14 days with redness and light scabbing. Resist picking at flakes—they protect new skin underneath. Then, deeper tissues mend for 4-6 weeks, even if the surface looks healed.
Follow these steps for success:
- Clean gently with fragrance-free soap 2-3 times daily
- Apply a thin layer of ointment to prevent cracking
- Wear loose pants to minimize friction
Avoid workouts that bend the joint excessively for 3 weeks. Notice unusual swelling? Consult your artist immediately. For those reconsidering their design, explore removal options early in the healing phase.
Tips for Selecting the Right Tattoo Artist

Finding the perfect match for your body art journey starts with strategic research. Specialized artists understand how joints move and how ink settles over time. Their expertise ensures your design stays crisp through years of motion.
Key Questions to Uncover Expertise
Start conversations by asking targeted questions. A seasoned professional will explain their approach to curved surfaces and frequent movement. “How do you adjust shading techniques for high-flex areas?” reveals their technical knowledge.
| Question | Purpose |
|---|---|
| “How many joint projects have you completed?” | Assesses hands-on experience |
| “What needle configurations work best here?” | Tests technical adaptation skills |
| “Can I see healed photos of similar work?” | Shows long-term result quality |
Decoding Portfolios and Studio Standards
Look for artists who showcase dynamic designs on rounded body parts. Check if their Instagram highlights include healed joint pieces. Studios with medical-grade sterilization protocols minimize infection risks.
- Compare pricing models: hourly vs. project-based
- Verify state licensing and bloodborne pathogen certifications
- Assess communication style during consultations
Remember: a top-tier artist invests time in understanding your vision while educating you about the process. Their portfolio should demonstrate both artistic flair and anatomical precision.
Placement and Design Considerations for the Knee

Positioning your ink strategically transforms both aesthetics and comfort. The joint’s unique structure offers distinct zones that influence visual impact and practicality. Let’s break down how location choices shape your experience and results.
Kneecap vs. Side Placement
Central placements create striking focal points but demand courage. Thin skin over bone amplifies discomfort—many compare it to pain levels similar to elbow work. Designs here often simplify to bold lines or symbols that withstand movement.
| Placement | Pain Level | Healing Time | Design Options |
|---|---|---|---|
| Kneecap | High | 3-4 weeks | Minimalist symbols, geometric shapes |
| Inner/Outer Sides | Moderate | 2-3 weeks | Detailed florals, intricate patterns |
Side areas provide more flexibility. Extra muscle and fat cushion needles, making sessions more manageable. These zones let artists incorporate shading or delicate elements that wrap around the leg naturally.
Integrating Ink with Full Leg Artwork
Your joint can unify thigh and calf pieces into cohesive sleeves. A circular mandala might transition into vinework above and below. “Treat it as a bridge between sections,” suggests a Miami-based artist. This approach balances empty spaces while highlighting the body’s contours.
Consider these integration tactics:
- Use matching color palettes across connected areas
- Repeat motifs like leaves or arrows to create rhythm
- Position focal points where fabric naturally draws attention
Collaborate with your artist to map proportions. What looks balanced when standing might stretch oddly when seated. Test stencils in multiple positions to ensure harmony in every pose.
Cost, Session Time, and Budgeting for Knee Tattoos
Understanding the financial commitment helps you plan better for your body art journey. Prices swing widely based on design scope and artist expertise—a simple symbol might take one session, while intricate sleeves demand multiple visits. Let’s unpack what shapes your investment.
Breaking Down Price Influencers
Design complexity drives both time and cost. A minimalist piece could wrap in 2-3 hours, whereas detailed artwork might span several sessions. Artists with specialized joint experience often charge premium rates—their skill ensures crisp lines that last through years of movement.
Geographical location plays a role too. Urban studios frequently charge 20-40% more than rural ones. Hourly rates ($150-$300) add up quickly, so ask if your artist offers flat fees for predictable budgeting. Don’t forget aftercare products and touch-ups—these hidden costs matter.
Session duration fluctuates based on your pain tolerance and design demands. Breaks stretch timelines, so discuss pacing preferences upfront. Remember: quality work takes time. Prioritize artists who balance speed with precision—your skin deserves it.